DS router (Android)
Version 2.0
DS router is designed as your personal network control center on your mobile device. From the initial setup of your Synology Router to monitoring network status and managing Internet activity on your network, DS router makes network management easy, intuitive, and mobile.
The DS router help article describes the entire functionality of the DS router app. Some features of your Synology Router may differ depending on the model or router mode you select.
Before You Start
Follow the instructions provided in the Quick Installation Guide of your Synology Router to install and connect your router. Power on your router.
| Router Status | LED Color & Behavior | ||
|---|---|---|---|
| MR2200ac | RT2600ac | RT6600ax | |
| Booting up | Static blue | Static orange | |
| Ready for setup | Blinking blue | Static green | Blinking green |
| No power | LED off | ||
The first-time setup can be done on the DS router app or on a web browser.
Getting Started
This section will show you how to set up your Synology Router through DS router.
To set up the Synology Router using your mobile device:
- Turn on your Synology Router, and position your mobile device within a range of 10 meters.
- Go to the Wi-Fi Settings of your mobile device and select the wireless network of your Synology Router.
Note: If the wireless network of your Synology Router does not appear in the list of available networks, make sure the Wi-Fi button on the Synology Router is on. - Return to the DS router app and you will be directed to the setup page. Follow the instructions provided by the wizard.
To connect to a set-up Synology Router:
- If you are in the same physical location as the Synology Router, connect to its network, and open DS router. DS router should automatically fill in the gateway IP address for you, or you can manually specify it yourself.
- Alternatively, if you are away from home or not in the same network as your router, you can connect to the Synology Router via its IP address, DDNS, or QuickConnect ID (if already set up). Simply open DS router, tap
 to manage an existing router, and enter the IP address/DDNS/QuickConnect ID along with your user credentials.
Overview
DS router includes the following main sections:
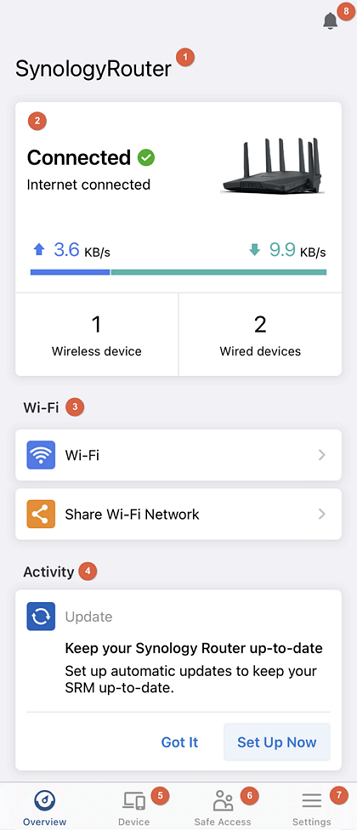
- Server name: Name of the Synology Router.
- Status: Provides a quick overview of the Synology Router’s connection status and connected clients. If additional Wi-Fi points are installed, you can also view the status of your Wi-Fi points and how many are connected.
- Wi-Fi: Manage and share your Wi-Fi networks.
- Wi-Fi: Tap to view and manage your Wi-Fi networks.
- Share Wi-Fi Network: Tap to choose a Wi-Fi network to share.
- Activity: Displays actionable items for your Synology Router.
- Device: Displays a list of clients and their connection status for your Synology Router.
- Safe Access: Create profiles and manage devices in your network.
- Settings: More detailed settings are available; you can also search for the function you need. The option to reboot your Synology router can be found here.
- Notifications: Displays a list of notifications from your Synology Router.
Device List
Under Device List, you can view a list of clients for your Synology Router. The list can be filtered to show only wireless or wired clients. Tapping on a specific device on the list allows you to view more information about that client (e.g., MAC address and IP address). The following options are available for configuration:
- Device name: Tap on the device name to specify a custom name for your client. Tap on the icon to choose an icon suitable for your client.
- Traffic Control: You can choose a connection priority for your device, or pause its Internet access.
Safe Access
Under Safe Access, you can create profiles, set up different levels of web filters, and impose daily time quotas and Internet schedules on different users.
Tapping on a target profile will allow you to see its overall status as well as other information such as its Internet usage time by day, its remaining Internet connection time, and a list of access attempts to blocked websites.
To create a profile:
You can choose to create a profile for a child, an adult, or a network.
Note: The management functions of network profiles differ from those of a child or an adult.
- Profile for a child or an adult: To assign specific devices to a profile, either a child or an adult profile. If you cannot find your devices, make sure they're connected to your Synology Router and have not been assigned to another profile.
- Profile for a network: Manage the unassigned devices connected to specific local networks.
To manage device connection time:
- Internet schedules: Internet schedules allow you to set specific time periods for users to access the Internet. Different schedules can be set for each day.
- Time quota: Set up the time quota for a profile according to a specific day. You can set up different time quote for different workdays. For example, you can set a longer time quota for weekends and a shorter time quota for weekdays.
- Pause the Internet connection: If you have enabled Internet schedule, you can see the pause button on the profile you created. Tapping on the pause button for this profile will ensure that all devices under this profile will not be able to access the Internet.
- Reward a profile: Reward Internet access time to specific profiles.
To configure security management:
- Web Filter: Apply a default web filter or a custom web filter to the profile.
- Safe Search: Filter inappropriate results from Google, Bing, YouTube, and Duckduckgo search.
Wi-Fi
Under Wi-Fi, you can view, manage and share your Wi-Fi names (SSIDs), as well as set up additional Wi-Fi points, WPS, and MAC filters.
To view a list of your Wi-Fi names, go to Overview or Settings, then tap Wi-Fi. SSIDs are organized according to the local network to which they are assigned.
To create a Wi-Fi network:
- Under Overview or Settings, tap on Wi-Fi.
- At the top right corner of the screen, tap on
 .
. - Enter a Wi-Fi name (SSID) and password.
- If there is an existing local network without an assigned Wi-Fi name (SSID), you will be asked to join an existing network or create a new local network.
- Create an isolated network: Select this option to create a new local network that is isolated from other networks.
- Join an existing network: Select this option to assign this Wi-Fi name to an existing network with no Wi-Fi.
- Tap Save.
To edit a Wi-Fi network:
- Tap on
 then select Edit to configure or Delete.
 - Configure the following settings and tap Save:
- Smart Connect: Swipe to enable automatic band steering. This option directs connected devices to the Wi-Fi band that provides the strongest speed and signal.
- Enable wireless radio: Tap to enable your Wi-Fi network.
- Name (SSID): Specify a unique name for your Wi-Fi network.
- Security Level: Select an encryption protocol for your Wi-Fi network. Note: This option may not be available for certain encryption protocols.
- Password: Specify a password for your Wi-Fi network.
- MAC filter: Tap to assign a MAC filter to this Wi-Fi network.
- Schedule: Tap to set days and times that your Wi-Fi network turns off automatically.
Note:
- If Smart Connect is deactivated, you have the option of setting up your Wi-Fi network with separate SSIDs for each wireless band (2.4 GHz/5 GHz).
To share your Wi-Fi:
- Under Overview or Settings, tap on Share Wi-Fi Network.
- Choose a Wi-Fi network (SSID) to share. A QR code with connection information will be displayed for that SSID.
- You can share your Wi-Fi network by allowing another device to scan your QR code.
Note:
- Security levels that do not support the use of QR codes include WPA2-Enterprise, WPA3-Enterprise, and WPA/WPA2-Enterprise.
- iOS devices will not be able to join a Wi-Fi network via QR code if the security level of the network is set to WPA2/WPA3-Personal.
- Not all QR code scanners can successfully detect or connect to a Wi-Fi network via a QR code.
To enable WPS (Wi-Fi protected setup):
Wi-Fi Protected Setup (WPS) is a standard promoted by the Wi-Fi Alliance to simplify wireless security settings for users.
- Go to Settings > Wi-Fi > WPS.
- Swipe on the toggle next to Enable WPS.
- Select an SSID that clients will connect to via WPS by tapping on Wi-Fi name (SSID).
- Choose a Connection method:
- Connect using the PUSH button: Press the WPS button on your Synology Router or tap Connect.
- Connect using the AP PIN code: Enter the PIN code in your wireless device. You can regenerate the PIN code by tapping the refresh button.
- Connect using the client PIN code: Enter your wireless device’s PIN code, then tap Register.
Note:
- Client iOS devices cannot be joined to a WPS network because iOS does not support WPS.
- Connections using the AP PIN code and Client PIN code are not available in a mesh system.
To create MAC filter rules:
MAC address filtering allows you to block traffic from known machines or devices. A system block list containing devices automatically blocked by broadcast storm prevention will be created by default.
- Go to Settings > Wi-Fi > Mac Filter.
- Tap on Create MAC Filter.
- Enter the MAC filter name and select an access policy:
- Deny: Restricts the specified MAC address from accessing the wireless network.
- Allow: Restricts all access to the wireless network except for the specified MAC address.
- To add devices to your MAC filter, tap on Device List, then tap Add or
 . Select a connected device or manually specify a device name and MAC address. Tap Save when done.
 - Swipe on the toggle next to Automatically apply this filter to all Wi-Fi names.
- Confirm your settings and tap Save.
To edit the system block list:
- Go to Settings > Wi-Fi > Mac Filter.
- Tap on System Block List.
- Edit the device list:
- Add a device to the list: Select a connected device or manually specify a device name and MAC address.
- Remove a device from the list: Tap the x next to the device you want to remove.
 , then swipe on the toggle.
Wi-Fi Point
To add Wi-Fi points:
- Go to Settings > Wi-Fi Point.
- Tap Add or
 . You can deploy a mesh Wi-Fi system through wired uplinks, wireless uplinks, or a combination of these two types.
 - Follow the instructions of the wizard and place your Wi-Fi points at suitable locations. When done, power them on and wait until the LED indicators start blinking.
- The wizard will start scanning for available Wi-Fi points. When the scan is complete, please make sure to enter the correct PIN codes for the Wi-Fi points that are connected through Ethernet uplinks. Besides, you can name the Wi-Fi points by the list of default locations or customize the names for easier recognition.
To monitor your Wi-Fi system status:
- When you have already added at least one additional Wi-Fi point to the mesh Wi-Fi system, you can see the list of Wi-Fi points and the network map on the Wi-Fi Point page. You can find the following information on each Wi-Fi point:
- Uplink: Tap on Network Map for more information.
- Wi-Fi Device: Shows the number of wirelessly connected client devices of each Wi-Fi point.
- Wi-Fi Transmission Rate: Shows the transfer rate of data from the Wi-Fi point (TX) and the transfer rate of data towards the Wi-Fi point (RX).
- Select the Wi-Fi point you wish to monitor and you can find the following tabs:
- General: You can edit the Name of the Wi-Fi point and view the general information.
- Network: You can monitor the network status of each wireless band of the Wi-Fi point.
- Wi-Fi Clients: You can view the client devices which are wirelessly connected to the Wi-Fi point.
To configure an individual Wi-Fi point:
At Settings > Wi-Fi > Wi-Fi Point, select the device you wish to configure and tap to do the following actions:
- Turn on or off LED: Turn off the LED indicator of the selected Synology Wi-Fi point device.
- Blink to find: The LED indicator of the selected Synology Wi-Fi point will start blinking so that you can easily find its location.
- Restart now: The selected Wi-Fi point will restart immediately.
- Delete & Reset: The selected Wi-Fi point will be removed from the mesh Wi-Fi system and reset to factory settings.
To check your network map:
Go to Wi-Fi Point and tap Network Map. A visual display of how each Wi-Fi point is connected to its paired device in the direction towards the Internet can be seen. You can also see the type of uplink (wired or wireless) and, if wireless, the Wi-Fi band used.
Swipe around to see the half-hidden icons of your Wi-Fi points.
Internet
This section contains options for you to manage the Internet connection of your Synology Router, monitor traffic, connect to VPN, and set up port forwarding.
To select your Internet type:
- Go to Settings > Internet > Internet.
- Tap on Connection Type.
- Select a connection type from the drop-down menu:
- Auto IP: N/A
- Manual IP: Enter the IP address, netmask, DNS server, and gateway for your Synology Router.
- PPPoE: Enter the Username and password required by your ISP.
- DS-Lite: Select a configuration type, then fill in the required fields.
Note:
- You can configure additional ISP settings by tapping on Special Requirement from ISP. Settings for advanced DHCP and IPTV & VoIP can be found here.
To monitor network status:
Go to Settings > Internet > Traffic Monitor to view the real-time network throughput of each connected device will display in a graph. You can also monitor historical traffic statistics and measure an application's network traffic.
To view more detailed traffic statistics regarding individual applications, tap on  to enable Record traffic statistics and application detection.
To connect to VPN
- Go to Settings > Internet > VPN to view a list of VPN you can connect to.
- To connect, tap on the VPN name, then swipe on the toggle next to Connection.
Note:
- VPN connections can be configured by signing into SRM on a web browser and going to Network Center > Internet.
To create port forwarding rules:
- Go to Settings > Internet > Port Forwarding and tap
 .
. - Specify the following information:
- Name: The name of the rule
- Private IP Address: The IP address for the client device in the local network
- Private Port: The port for connection with the service/client device
- Public Port: The port for connection with the Internet (We recommend this port differ from the private port to protect the service/client device ports from direct exposure to cyber threats.)
- Protocol: The service/device protocols (TCP guarantees data integrity with a slower transfer speed; UDP promises quick data transfer but not data integrity.)
- Additional settings are available by tapping on
 :
:
- Restore UPnP rules upon startup
- Generate firewall rules automatically (UPnP client)
- Generate firewall rules automatically (Port Forwarding)
Account Management
This section allows you to manage your Synology Account and QuickConnect.
Synology Account
Synology Account is a service-integrated platform that allows you to register a QuickConnect ID and DDNS to use with your Synology Router.
Go to Settings > Account Management > Synology Account to Sign In. If you do not have an account, you can quickly create one by tapping Create an account.
QuickConnect
QuickConnect allows you to easily connect to your Synology Router via a short and customizable address (e.g., Quickconnect.to/example) over the Internet without the hassle of setting up port forwarding rules or other complicated Internet settings.
To enable, go to Settings > Account Management > QuickConnect and swipe on the toggle next to Enable QuickConnect.
Security
Under Security, you can protect your Synology Router and its services/client devices by using Firewall or Auto Block.
To create firewall rules:
- Go to Settings > Security > Firewall.
- Tap
 to specify the rule content.
 - To reorder firewall rule priority, tap
 , press and hold
  , and drag and drop the rules in appropriate positions.
To enable Auto Block:
- Go to Settings > Security > Auto Block, then tap
 .
. - Enable Auto Block, and specify the conditions that trigger Auto Block.
- To suspend Auto Block after a specified period, enable Expiration time.
To allow/ban an IP address using Auto Block:
You can manually permit/deny access from specific IP addresses to your Synology Router and devices in the local network.
- Go to Settings > Security > Auto Block and tap
 .
. - To allow access from specific IP addresses, tap Add allowed IP address; to ban access from specific IP addresses, tap Add blocked IP address.
System
View and configure basic settings for your Synology Router here.
To view basic information about your Synology Router:
- Go to Settings > System > Router Information.
- Basic information about your Synology Router such as the model name, serial number, and SRM version can be viewed here.
- Manage the following settings:
- Name: Tap on the arrow to customize the name of your Synology Router.
- LED: Swipe on the toggle to turn the LED on your Synology Router on or off.
To keep your Synology Router up-to-date:
- Go to Settings > System > Update.
- When a newer version of SRM is available, you can tap Download to start downloading the update.
- When the download is complete, do either of the following:
- Tap Update Now to start installing the update.
- If the download has failed, tap Try Again to restart the download.
- You can customize SRM update settings to determine to what extent you wish to update SRM.
Note:
- You can tap What's New to view the information of the latest SRM update.
- In most situations, SRM updates will not affect any data stored on your Synology Router. However, we still recommend data backup before updates to avoid any risks of data loss.
- Refrain from shutting down your Synology Router during the update to avoid interruption of the process.
- When you see any error messages (in red fonts) during the checking or downloading of the newest SRM version, please try the actions below for troubleshooting:
- Make sure your Synology Router has been properly connected to the Internet.
- Synology's servers may be busy handling massive download requests. Please wait for a while and try to restart the download later.
- When Install important SRM updates automatically is enabled, you can also schedule the automatic installation of the downloaded updates with Scheduled installation date and Scheduled installation time settings.
To configure notification
- Go to Settings > System > Notification Settings.
- Tap Notification to view notifications.
- To enable push notifications, swipe on the toggle next to Push service.
To activate Wake on LAN
- Go to Settings > System > Wake on LAN.
- Tap
 to add.
 - Select a device from the drop-down menu or enter the MAC address of a subordinate wired device that supports WOL.
- Click Save. You can now remotely awake the device by tapping
 in the WOL list.
Note:
- This WOL service does not apply to subordinate wireless devices.
- If you cannot wake up a subordinate wired device, check its WOL settings and network connection.
To manage USB devices:
- Go to Settings > System > USB Device.
- Tap Eject to eject the external storage device.
Others
Tap on Settings > More info to view and configure other information such as the trusted connection list and usage analytics.
To manage usage analytics
Enable or disable Google Analytics for Firebase. With this option enabled, required device information and crash logs will be collected to help enhance user experience. Your private data and information will not be collected.
To manage connection security
View or remove a connection that you have set up on this device.
Troubleshooting
What do different LED colors mean while adding a Wi-Fi point?
| Router Status | LED Color & Behavior | ||
|---|---|---|---|
| MR2200ac | RT6600ax | ||
| Ready | Blinking blue | Blinking green | |
| System starting | Solid blue | Solid orange | |
| Finding device | Blinking green continuously | Blinking green and orange alternatively | |
| Error | Solid red | Blinking orange | |
| Syncing settings | Blinking green in turn | n/a | |
| No power | LED off | ||
Ready
Now you can scan for this Wi-Fi point and add it to your network.
System starting
Wait until the LED indicator starts blinking.
Finding device
The LED indicators will continue to blink for 2 minutes while finding this device.
Syncing settings
Wi-Fi points are syncing settings.
Error
Reset the Wi-Fi point by pressing the RESET for 10 seconds. If the problem persists, please contact us.
No Power (Light Off)
Please make sure the power cord is properly connected between the Wi-Fi point and outlet. If the problem persists, please contact us.
My Wi-Fi point not detected. What can I do?
- Check the power: Please make sure the power cord is properly connected between the Wi-Fi point and outlet.
- Check the STATUS LED indicator: Please make sure the STATUS LED indicator is blinking.
- Move your Wi-Fi point: Please move the Wi-Fi point closer to your primary Synology Router.
- Reset your Wi-Fi point: Please reset the Wi-Fi point by pressing RESET for 10 seconds, then wait until the STATUS LED indicator starts blinking.
The STATUS LED is not blinking. What can I do?
- Please be patient: The Wi-Fi point is getting ready. The startup process may take some time.
- Reset your Wi-Fi point: If your Wi-Fi point fails to get ready within 10 minutes, reset it by pressing RESET for 10 seconds. Then, wait until the STATUS LED indicator starts blinking.
How do I identify each Wi-Fi point?
You can identify a Wi-Fi point by its serial number. The serial number is printed on the label attached to each Wi-Fi point. When a Wi-Fi point is detected, its serial number is displayed.
Can I connect to a Wi-Fi point via Ethernet?
Yes. A Wi-Fi point can be connected via Ethernet, but there are some limitations during an initial installation using Ethernet cables.
Note:
- When in wireless router mode, please use the primary network's ports to connect Wi-Fi points. These ports must be trunk ports if you have set up multiple local networks (i.e., VLANs). Please note that this feature is only available for SRM 1.3 and above.
- When the primary Wi-Fi point is an MR2200ac with the IPTV option enabled, the Ethernet uplink will be disabled accordingly. Therefore, the setup wizard of the mesh Wi-Fi system will ask you to remove your Ethernet cable if you wish to connect a Wi-Fi point to the primary one.
- Wireless uplinks followed by wired uplinks are not supported in daisy-chain topologies.
- Adding additional Wi-Fi points by Ethernet cables to a mesh Wi-FI system is only supported by SRM 1.2.4 and above; we recommend updating SRM to the latest version before deploying a mesh Wi-Fi system.
I am unable to set up a Wi-Fi point. What can I do?
- Power outage: Please check the power cord of your Wi-Fi point.
- Signal interference: Please keep the wireless coverage range of your Wi-Fi point clear of other devices that are emitting wireless signals.
- Ethernet still connected: Setup with an Ethernet cable might lead to setup failure; unplug the Ethernet cable, and run the wizard to add the Wi-Fi point wirelessly.
- Could not establish connection: Please move the Wi-Fi points closer to the parental one and try again.
- Incompatible firmware version between primary and additional Wi-Fi points: Please go to SRM > Control Panel > System > Update & Restore on the primary Wi-Fi point, and update SRM to the latest version.
- System update failed: Please check the Internet connectivity first. Then, you can press the RESET button on the Wi-Fi point for 10 seconds and run the wizard again. If the issue persists, please contact us.
- Internal error: Please press the RESET button on the Wi-Fi point for 10 seconds, and run the wizard again. If the issue persists, please contact us.
- Failed to get the update: Please visit the Synology website to download the latest SRM version to your computer. After the download, go to SRM > Control Panel > System > Update & Restore on the primary Wi-Fi point, and click Manual SRM Update to upload it for the manual update.
How many Wi-Fi points can be connected?
- 1 Primary Wi-Fi point + 6 Wi-Fi points (in a wireless-only uplink network).
- 1 Primary Wi-Fi point + 12 Wi-Fi points (in a wired-only uplink network).
Note:
- We recommend deploying Wi-Fi points in parallel instead of sequentially to enhance the throughput.
I can't connect to the Internet. What can I do?
- Make sure that all equipment is connected properly. For example, check if the modem and Synology Router and both plugged into power outlets and powered on.
- Restart the modem and Synology Router.
- Check your ISP settings:
- See if the available connection types detected (such as Auto, DHCP, or PPPoE) are consistent with what your ISP provides.
- Check your ISP's special settings, as some ISPs may require you to configure additional settings, such as DHCP options, IPTV/VoIP, or PPTP.
- Reset your Synology Router.
Note:
- If you are still unable to connect to the Internet after trying the methods above, please refer to this article.
The LED indicators on my Synology Router do not function as expected after a long wait. What can I do?
Follow the instructions in this article to do a hard reset of your Synology Router and try again.