Snapshots
This page allows you to take, remove, and edit snapshots, as well as to configure snapshot schedule and retention settings.
Snapshots minimize disk consumption by preserving individual blocks rather than whole files. Extra space may be consumed when the files in shared folders or blocks in LUNs are updated or removed.
Shared Folder
To take a snapshot for a shared folder:
- Select the shared folder of which you wish to take a snapshot.
Note: You can press and hold Ctrl or Shift to select multiple items. - Click Snapshot > Take a Snapshot.
- Enter the description in Description for the snapshot to be taken.
- Select/unselect the Lock checkbox to prevent this snapshot from being automatically removed when the automatic removal is triggered.
- Select the Immutable snapshots checkbox and set a Protection period. This function prevents this snapshot from being removed for a specified period. We recommend setting this period to between 7 and 14 days.
Note: Once the Immutable snapshots checkbox is selected, you cannot unselect it. This option will be automatically unselected by the system when the protection period ends. - Click OK to start taking a snapshot.
Note:
- You cannot take snapshots if the available space of the volume is less than 100 MB.
- Among the settings in Control Panel > Shared Folder > Edit, only the NFS permission will not be recorded in a snapshot.
- Snapshot protects the data within recycle bin.
- You cannot delete the shared folders that have immutable snapshots until the protection period of the snapshots ends.
To make snapshots visible:
The folders and files in snapshots can be accessed via file services in #snapshot folders of the shared folder.
- Select a shared folder of which you wish to make the snapshots visible.
- Click Settings.
- Go to the Advanced tab, and select the Make snapshot visible checkbox.
Note:
- Users do not have the write permission for any snapshot copies.
- Users have the read permission of the snapshot copy only if, at the time when the snapshot is taken, their user accounts have been created and they have been granted the read permission of the shared folder.
To browse snapshots of a shared folder:
- Select a shared folder of which you wish to browse the snapshots.
- Click Snapshot > Snapshot List.
- Select a snapshot you wish to browse, and click Browse.
Note:
- Snapshots of encrypted shared folders cannot be browsed.
To remove snapshots of a shared folder:
- Select a shared folder you wish to remove the snapshots of.
- Click Snapshot > Snapshot List.
- Select one or more snapshots you wish to remove, and click Remove.
Note: You can press and hold Ctrl or Shift to select multiple items. - You will see a confirmation message. Click Delete to confirm the removal. The system will delete snapshots in the background. Deleting a large number of snapshots may prolong the processing time.
Note:
- If a shared folder is replicated, its latest snapshot synced to the destination server will be preserved and cannot be removed.
- For better replication performance, several snapshots of the shared folder will be prevented from removal during the sync.
- If you find that released space is less than expected when you delete snapshots, it might be because space reclamation is processing or because the space is still occupied by other snapshots, recycle bins, or file clones. To learn how much space you can free, please use the snapshot calculator.
- Immutable snapshots cannot be deleted during the specified period. If you try to delete multiple snapshots and some of them are immutable snapshots, the Delete button will be disabled.
To estimate storage usage by snapshots of a shared folder:
- Select a shared folder you wish to evaluate snapshot usage of.
- Click Snapshot > Calculate Size.
- Select a time range by entering a start date and an end date, and then click Calculate now.
Note: The minimum time range is 7 days.
Note:
- Only one shared folder can be estimated at a time.
- The result is an estimation only. Actual snapshot usage depends on operations performed to the shared folder (e.g. snapshot restoration, data cloning, etc.).
- If recycle bin is enabled in the shared folder, the deleted files will stay in the recycle bin and will not affect the size of the snapshots. However, if you delete the data that have been taken snapshots it will affect the size of the snapshots.
To view storage usage by snapshots of a shared folder:
After the estimation task is completed, click Task done to view the storage estimation report. Move the mouse cursor to view storage usage accumulation.
To clear a finished estimation task:
In Snapshots > Shared Folder, select a shared folder and click Clear to erase task details.
To edit snapshots of a shared folder:
- Select a shared folder you wish to edit the snapshots of.
- Click Snapshot > Snapshot List.
- Select a snapshot you wish to edit, and click Edit.
- You can do any of the following:
- Change the description of the snapshot in Description.
- Select/unselect the Lock checkbox to prevent this snapshot from being automatically removed when the automatic removal is triggered.
- Select the Immutable snapshots checkbox and set a Protection period. This function prevents snapshots from being removed for a specified period. We recommend setting this period to between 7 and 14 days.
Note: Once the Immutable snapshots checkbox is selected, you cannot unselect it. This option will be automatically unselected by the system when the protection period ends.
- Click OK to save your settings.
To configure scheduled snapshots:
With scheduled snapshots, Snapshot Replication will automatically take snapshots at the pre-determined time and frequency, and it will thus lighten your workload to take snapshots manually.
- Select a shared folder.
Note: You can press and hold Ctrl or Shift to select multiple items. - Click Settings.
- In the Schedule tab, select the Enable snapshot schedule checkbox, and set up the time and frequency to take snapshots. To cancel scheduled snapshots for this shared folder, please unselect the checkbox.
- Select the Immutable snapshots checkbox and set a Protection period. This function prevents snapshots from being removed for a specified period. We recommend setting this period to between 7 and 14 days.
- Click OK to save your settings.
- You will see a confirmation message. Click OK to confirm the configuration.
Note:
- Scheduled snapshots' configuration will not be included in the Control Panel > Update & Restore > Configuration Backup feature.
To check the remaining protection period of immutable snapshots:
- Select a shared folder that contains immutable snapshots.
- Click Snapshot > Snapshot List.
- You can do either of the following:
- Hover over an immutable snapshot icon.
- Select a snapshot and click Edit.
To configure the retention settings for the scheduled snapshots:
- Select a shared folder.
Note: You can press and hold Ctrl or Shift to select multiple items. - Click Settings.
- Select the Retention tab.
- Specify how to retain and delete snapshots. Choose between these three options:
- Numbers of latest snapshots to keep: Specify the number of the latest snapshots to retain.
- Keep all snapshots for: Retain all snapshots taken within certain days.
- Advanced retention policy: You can configure retention rules for specified time ranges. Click Set Rules to edit the retention rules. For more information, please refer to the Retention Policy section.
- Click OK to save your settings.
- You will see a confirmation message. Click OK again to confirm the configuration.
To configure the snapshot naming policy:
- Select a shared folder.
Note: You can press and hold Ctrl or Shift to select multiple items. - Click Settings.
- Select the Advanced tab.
- Select/unselect the Use the time in the GMT +0 time zone to name the snapshots checkbox.
- If the checkbox is selected, snapshots will be named after the Greenwich Mean Time (GMT) when they are taken. If your shared folders are accessed by users in different time zones or if your replication tasks are run across different time zones, it is recommended that you select this option to avoid misleading time information in snapshot names.
- If the checkbox is not selected, snapshots will be named after local time when they are taken. You can set the server's date and time in Control Panel > Regional Options.
- Click OK to save your settings.
Note:
- In older versions of Microsoft Windows, Windows File Explorer can only display Greenwich Mean Time (GMT) format in the Previous Versions tab. If you choose to name snapshots after local time, the snapshot names may show differently on DSM and Windows File Explorer, while this does not affect the snapshot operations.
LUN
To take a snapshot for a LUN:
- Select the LUN of which you wish to take a snapshot.
Note: You can press and hold Ctrl or Shift to select multiple items. - Click Snapshot > Take a Snapshot.
- Enter the description in Description for the snapshot to be taken.
- Select/unselect the Lock checkbox to prevent this snapshot from being automatically removed when the automatic removal is triggered.
- Select the Immutable snapshots checkbox and set a Protection period. This function prevents this snapshot from being removed for a specified period. We recommend setting this period to between 7 and 14 days.
Note: Once the Immutable snapshots checkbox is selected, you cannot unselect it. This option will be automatically unselected by the system when the protection period ends. - Click OK to start taking a snapshot.
Note:
- You cannot delete the LUNs that have immutable snapshots until the protection period of the snapshots ends.
To remove a snapshot of a LUN:
- Select a LUN you wish to remove the snapshots of.
- Click Snapshot > Snapshot List.
- Select one or more snapshots you wish to remove, and click Remove.
Note: You can press and hold Ctrl or Shift to select multiple items. - You will see a confirmation message. Click Delete to confirm the removal. The system will delete snapshots in the background. Deleting a large number of snapshots may prolong the processing time.
Note:
- If a LUN is replicated, its latest snapshot synced to the destination server will be preserved and cannot be removed.
- For better replication performance, several snapshots of the LUN will be prevented from removal during the sync.
- If you find that released space is less than expected when you delete snapshots, it might be because space reclamation is processing or because the space is still occupied by other snapshots, recycle bins, or file clones.
- Immutable snapshots cannot be deleted during the specified period. If you try to delete multiple snapshots and some of them are immutable snapshots, the Delete button will be disabled.
To edit a snapshot of a LUN:
- Select a LUN you wish to edit the snapshots of.
- Click Snapshot > Snapshot List.
- Select a snapshot you wish to edit, and click Edit.
- You can do any of the following:
- Change the description of the snapshot in Description.
- Select the Consistent state if the application-consistent snapshot is enabled.
- Select/unselect the Lock checkbox to prevent this snapshot from being automatically removed when the automatic removal is triggered.
- Select the Immutable snapshots checkbox and set a Protection period. This function prevents snapshots from being removed for a specified period. We recommend setting this period to between 7 and 14 days.
Note: Once the Immutable snapshots checkbox is selected, you cannot unselect it. This option will be automatically unselected by the system when the protection period ends.
- Click OK to save your settings.
Note:
- You cannot take snapshots of LUNs when a volume has less than 1 GB of free space.
- To apply the features of snapshot and replication to LUNs, the LUNs must be created as Standard LUNs with storage acceleration or Advanced LUNs.
- SAN Manager is supported on DSM 7.0 and above. For DSM 6.2.x, please go to iSCSI Manager for corresponding functions. For DSM versions previous to DSM 6.2, please see Storage Manager.
- In Snapshot Replication on your Synology NAS, you cannot take/edit/remove the snapshots of any LUNs used by Cinder. For more information, please refer to the help articles for SAN Manager. For DSM 6.2.x, please go to iSCSI Manager for corresponding articles. For DSM versions previous to DSM 6.2, please see Storage Manager.
- Upon completion of taking a snapshot or creating a replication task, if the status turns out to be Abnormal/Crashed, please delete the snapshot/replication and try again.
- When you restore a LUN to a snapshot version, you will lose all changes made to this LUN after the time point when the snapshot was taken.
- If the status of a LUN changes to Unavailable, it means that some data-related errors occurred when the LUN is accessed. The LUN will be temporarily inaccessible to avoid severe data loss. Please contact Synology for support as soon as possible.
To configure scheduled snapshots:
With scheduled snapshots, Snapshot Replication will automatically take snapshots at the pre-determined time and frequency, and it will thus lighten your workload to take snapshots manually.
- Select a LUN.
Note: You can press and hold Ctrl or Shift to select multiple items. - Click Settings.
- In the Schedule tab, select the Enable snapshot schedule checkbox, and set up the time and frequency to take snapshots. To cancel scheduled snapshots for this shared folder, please unselect the checkbox.
- Select the Immutable snapshots checkbox and set a Protection period. This function prevents snapshots from being removed for a specified period. We recommend setting this period to between 7 and 14 days.
- Click OK to save your settings.
To check the remaining protection period of immutable snapshots:
- Select a LUN that contains immutable snapshots.
- Click Snapshot > Snapshot List.
- You can do either of the following:
- Hover over an immutable snapshot icon.
- Select a snapshot and click Edit.
To configure the retention settings for the scheduled snapshots:
- Select a LUN.
Note: You can press and hold Ctrl or Shift to select multiple items. - Click Settings.
- Select the Retention tab.
- Specify how to retain and delete snapshots. Choose between these three options:
- Numbers of latest snapshots to keep: Specify the number of the latest snapshots to retain.
- Keep all snapshots for: Retain all snapshots taken within certain days.
- Advanced retention policy: You can configure retention rules for specified time ranges. Click Set Rules to edit the retention rules. For more information, please refer to the Retention Policy section.
- Click OK to save your settings.
- You will see a confirmation message. Click OK again to confirm the configuration.
To configure the consistent state of your LUN snapshots:
- Select a LUN.
Note: You can press and hold Ctrl or Shift to select multiple items. - Click Settings.
- Select Application tab.
- Select/unselect Enable application-consistent snapshots checkbox to switch between the following consistent states:
- Application consistent: Snapshots in this consistent state can be taken only when Synology Storage Console is installed on your Windows server or VMware vCenter Server depending on your operating environment to communicate with DSM. When application-consistent snapshots are triggered on DSM, applications will be notified, and flush all the data from memory to the LUNs to be taken a snapshot of, hence the assurance of data consistency.
Note: If Synology Storage Console has not been installed on your operating environment, the application-consistent snapshot will remain disabled even if the checkbox is selected. - Crash consistent: If Synology Storage Console has not been installed on any of your clients, you can only capture crash-consistent snapshots of LUNs. When crash-consistent snapshots are triggered, applications will not be notified to flush the data from memory to the LUNs, hence the inability to guarantee data consistency.
- Application consistent: Snapshots in this consistent state can be taken only when Synology Storage Console is installed on your Windows server or VMware vCenter Server depending on your operating environment to communicate with DSM. When application-consistent snapshots are triggered on DSM, applications will be notified, and flush all the data from memory to the LUNs to be taken a snapshot of, hence the assurance of data consistency.
- Click OK to save your settings.
Note:
- Changing the consistent state settings will affect the equivalent settings in the Replication page.
____
Retention Policy
Setting a retention policy helps you manage your storage space more efficiently by keeping the snapshots you want. There are three options for retention policies to choose from:
- Numbers of latest snapshot to keep: Specify the number of the latest snapshots to retain.
- Keep all snapshots for: Retain all snapshots taken within certain days.
- Advanced retention policy: Snapshots can be kept for longer periods but your storage space can be saved at the same time.
- You can set multiple rules and customize the retention policy according to your needs.
- Retain all snapshots taken within certain days.
- Advanced retention policy also allows you to keep the latest snapshots of different time frames for certain periods. You can choose how long the hourly, daily, weekly, monthly, and yearly snapshots will be retained in the system. For example, Keep the latest snapshot of the week for 7 weeks means that the last snapshot taken during a week will be retained for seven weeks after it is taken.
- You will also need to set the Number of the latest snapshots to keep. If there are fewer snapshots than the specified number, the retention policy will not take effect. This is a required field.
- Advanced retention policy employs the GFS, or Grandfather-Father-Son, retention mechanism.
- A snapshot can meet more than one retention rule at a time. For example, a snapshot can be retained by the weekly retention rule and daily retention rule at the same time.
- You can set multiple rules and customize the retention policy according to your needs.
Example
It's October now and you have a snapshot schedule that takes one snapshot every day. If you are planning for a retention policy that covers the past nine months and want to keep
- Daily snapshots for the first 3 months (September, August, and July)
- Weekly snapshots for the 4th to 6th months (June, May, and April)
- Monthly snapshots for the 7th to 9th months (March, February, and January)
- 10 latest snapshots
you may refer to the following settings:
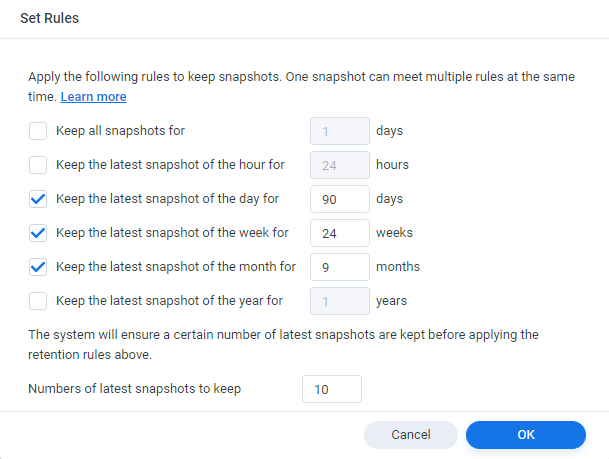
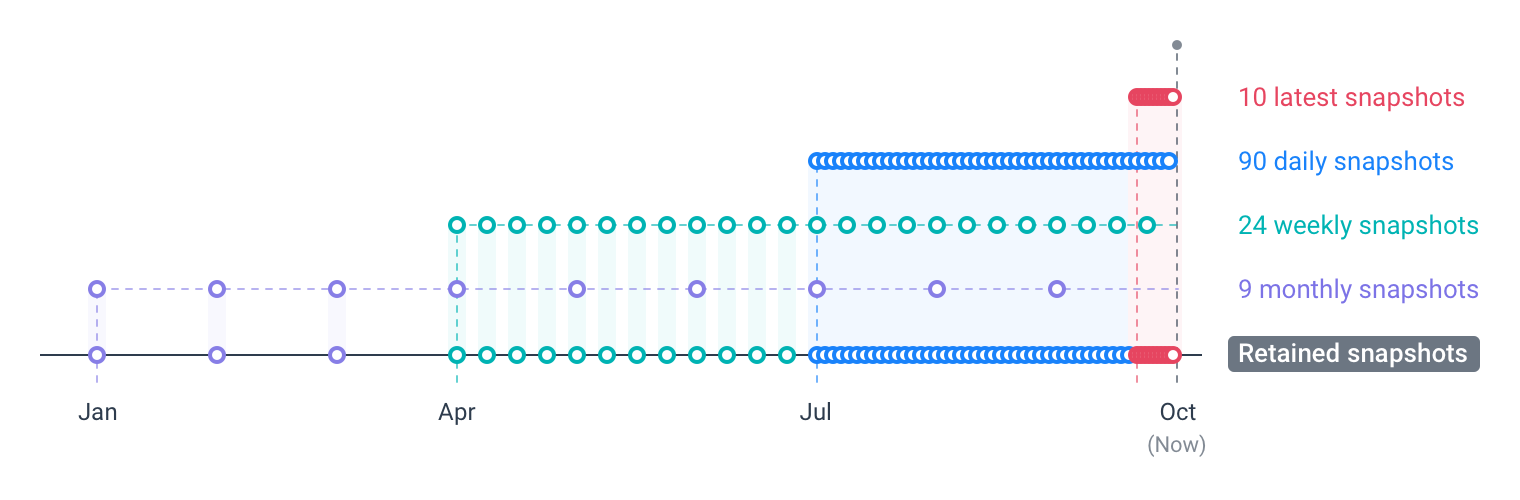
A snapshot can meet more than one retention rule. Therefore, the first weekly snapshot can also be the seventh daily snapshot, and the first monthly snapshot can also be the fourth weekly snapshot.
Setting the Number of latest snapshots to keep prevents the retention policy from deleting all snapshots when the system stops taking new snapshots, and the 10 latest snapshots will be the daily snapshots taken in the past 10 days.