How to enjoy multimedia contents stored on Synology NAS with DLNA/UPnP-compliant DMAs?
Last updated:22 Feb 2022
How to enjoy multimedia contents stored on Synology NAS with DLNA/UPnP-compliant DMAs?
Purpose
This article guides you through the steps of browsing and streaming multimedia contents from your Synology NAS to DLNA TV.
Details
What is DLNA?
- Digital Living Network Alliance (DLNA) actively promotes wired and wireless networks on consumer electronic devices while on the road or at the comfort of your home. DLNA is used for sharing digital media and content services.
What is UPnP?
- Universal Plug and Play (UPnP) allows multiple devices (such as personal computers, mobile devices, printer, etc.) to discover and connect to each other to share data.
What is DMA?
- Digital Media Adapter (DMA) is a home entertainment device that connects to a home network to retrieve digital media files (such as music, photos, or video) from a personal computer or other networked media server and plays them back on DLNA/UPnP-enabled devices.
Resolution
Before you start
- Set up your Synology NAS and DSM.
- Create at least one volume (refer to this article).
- Install Media Server from Package Center (refer to this article).
- Connect your DLNA TV/Sony PlayStation to the Internet with a LAN cable.
Playback settings configuration on your Synology NAS
- Set DMA menu language and style to organize your multimedia files.
- Adjust media browsing settings depending on your preferences and enable conversion support to play more multimedia files of various formats.
- Manage the device list to enhance DMA compatibility to make sure the multimedia contents are played smoothly on your DMA devices.
- Categorize multimedia files within the indexed folder to be browsed and played by the DMA devices within a local network.
To configure media playback settings on your Synology NAS:
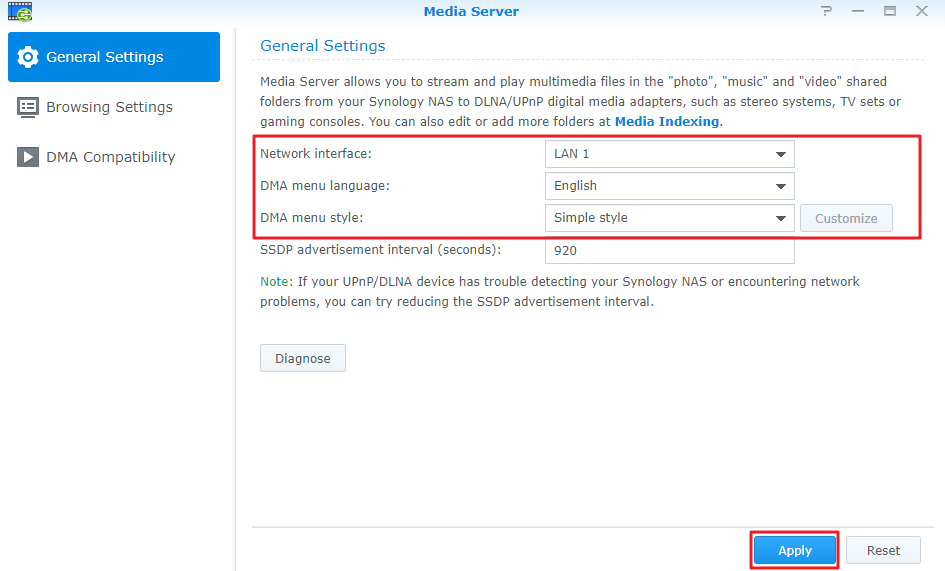
- Go to DSM > Main Menu > Media Server.
- Click the General Settings tab to adjust the settings of your DMA devices, and click Apply to save the changes.
- Language style
- Menu style
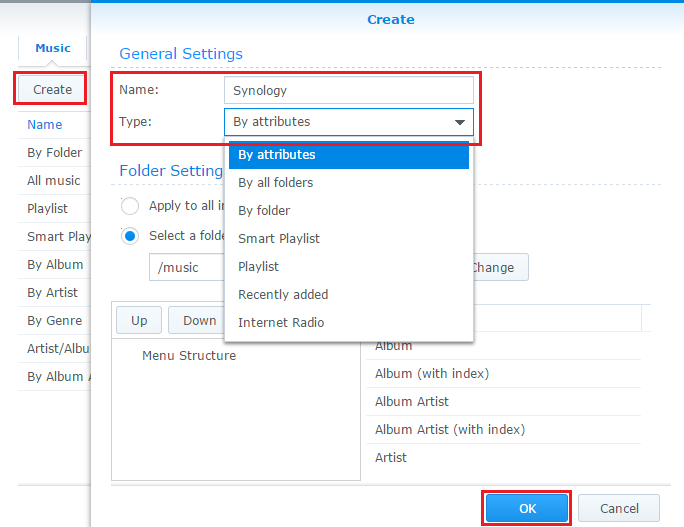
- Creating a new menu style: Choose one of the three custom options from the DMA menu style. Then select Customize > Create (under the Music, Photo, and Video tab) to add a category folder. Fill in the folder name and select the type of folder you preferred.
- Editing an existing menu style: Choose one of the three custom options from the DMA menu style > Customize (under the Music, Photo, and Video tab) to edit.

- Creating a new menu style: Choose one of the three custom options from the DMA menu style. Then select Customize > Create (under the Music, Photo, and Video tab) to add a category folder. Fill in the folder name and select the type of folder you preferred.
- Browsing Settings is where the DMA devices can access your media files.
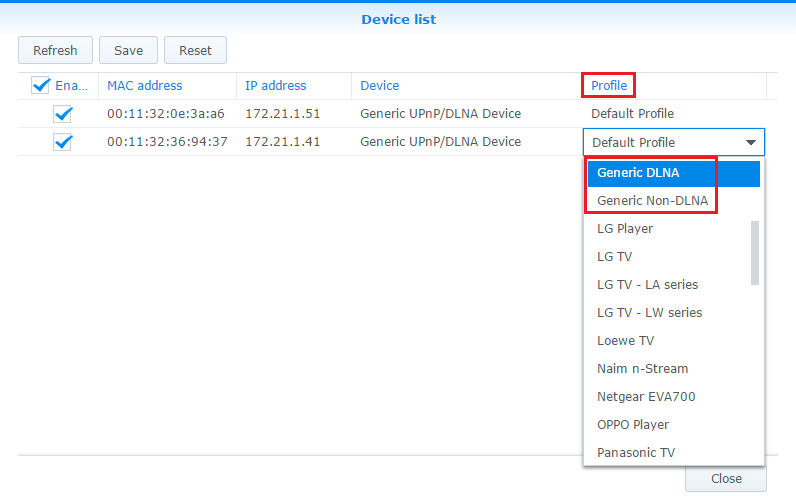
- Under the DMA Compatibility tab, follow the procedure to enhance DMA compatibility. Do not tick the Restrict access to Media Server for newly detected UPnP/DLNA devices and click Device list. The Media Server will not be accessible to your DMA device if you ticked the Restrict access to Media Server for newly detected UPnP/DLNA devices and the Default profile should be selected if the Media Server cannot identify the type of DMA device.3
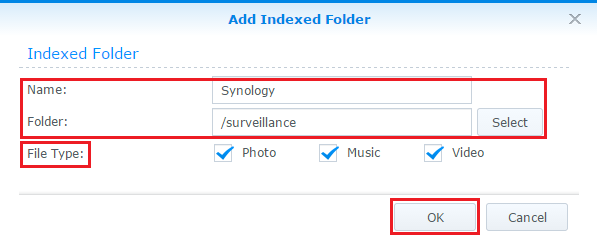
- To add more indexed folders, go to Control Panel > Indexing Service > Media Indexing > Indexed Folder > Create. File Type is for you to decide which type of media files to include in the indexed folder. You cannot add the mounted shared folders from remote servers as indexed folders, but you can add up to 100 indexed folders on your Synology NAS.
Enjoy multimedia with DLNA/UPnP-compatible devices
These DLNA/UPnP-compatible devices can easily be connected to your home network, just like any other desktop computer and media player. Only for a list of supported DLNA/UPnP TVs and DMA devices that have been verified by Synology.4
To access the media files stored on your Synology NAS with DLNA TV:
- Go to DSM > Main Menu > Media Server to enable DLNA service, press the Device button on your remote to select your Synology NAS.
- Media files: Go to Main Menu > Application > Media Play (USB & DLNA) > Photo5/Music/Movie.6
To access the media files stored on your Synology NAS with Sony PlayStation 3 & 4:
- Turn on both your TV and PlayStation 3 or 4, you will see the input source (depending on which type of video output cable is used).
- Select your Synology NAS from the list of devices on which media files you would like to access under the Photo, Music, or Video section.
- Once the Synology NAS is connected, you can view photos, listen to music, and watch videos with your PlayStation 3 & 4.7
Notes:
- If the NAS is only using LAN1, the Network Interface option will automatically hide.
- Not all languages and styles are supported by your DMA device. For the supported list of languages and styles, please refer to the User Guide of the device.
- If your device is not listed, try using Generic DLNA (for devices that support DLNA) or Generic Non-DLNA (for devices that do not support DLNA).
- Adjusting the Jumbo Frames size might affect Media Server's DLNA service. If you are experiencing difficulties with DLNA service, please try changing the Jumbo Frames size back to default.
- If you would like to browse more quickly, you can tick the Transmit low-resolution images instead of the original images checkbox under the Main Menu > Media Server > Browsing Settings. The photos displayed on the TV screen would be smaller.
- You cannot play all multimedia file formats supported by Synology NAS on your DLNA/UPnP-compliant TV. For the supported list of file formats, please refer to the User Guide of your TV.
- You cannot play all multimedia file formats supported by Synology NAS on PlayStation 3 & 4. For the supported list of file formats, please refer to the User Guide of your PlayStation 3 & 4.