Replication
This page allows system administrators to manage replications. You can create, edit, and delete replication tasks. You can also run/stop the syncing and view the information of your replication tasks.
Shared Folder
To create a replication task for a shared folder:
- Go to the Shared Folder tab.
- Click Create.
- You will see the Create Replication Task wizard. Follow the steps of the wizard to create a shared folder replication.
Note:
- The shared folder must be located on a Btrfs volume.
- According to your environment and needs, you can choose to replicate shared folders to another Synology NAS or another Btrfs volume on the local Synology NAS.
- You can create one-to-many/extended replications for a shared folder to at most 3 different destinations. However, each shared folder can have only one remote replication task to each destination server.
- The maximum number of replication tasks is limited to 64. For more information, please refer to the Technical Specifications.
- The port 5566 is reserved for data transfer of shared folder replications. If the source and destination servers are connected to different routers, you must set up port forwarding first.
- Snapshots that are not taken during the allowed transfer time will be transferred once entering allowed time.
- Synology Office data cannot be replicated to remote server. We suggest using Hyper Backup to back up your Synology Office data.
To delete a shared folder replication:
- Select the shared folder replication task you wish to delete.
Note: You can press and hold Ctrl or Shift to select multiple items. - Click Action > Delete.
- You will see a confirmation message. Click Delete to confirm the deletion.
To edit a shared folder replication:
- Select the shared folder replication task you wish to edit.
Note: You can press and hold Ctrl or Shift to select multiple items. - Click Action > Edit.
- You will see a window containing the following tabs:
- Partner Server
- Schedule
- Advanced
- In the Partner Server tab, you can edit the partner server information, including the hostname, username, and password. Click Advanced Settings and you will see a window containing the following tabs:
- Partner Server: If you have customized port forwarding rules, you can modify the ports that this server uses to connect to the partner server.
- Source Server: If you have customized port forwarding rules, you can modify the IP and ports that the partner server uses to connect to this server.
Note: You can leave the IP in Source Server blank to automatically detect the available IP to be connected by the partner server.
- In the Schedule tab, you can configure the following options:
- Replication schedule: Select the Enable replication schedule checkbox, and set up the time and frequency of the task.
- Timeout notification setting for the scheduled sync: You will be notified when the time of scheduled sync exceeds the waiting time.
Note: If you set the waiting time as 0, the system will not send any timeout notifications. - Only send snapshots within the transfer window: You can set a transfer window that allows snapshot transfers only during off-peak hours. By doing so, you can reduce the impact of snapshot transfer on system performance. Any incomplete transfers will be resumed during the next allotted time period.
- Immutable snapshots: Select this checkbox and set a Protection period. This function prevents replicated snapshots from being removed for a specified period. We recommend setting this period to between 7 and 14 days.
- In the Advanced tab, you can configure the following options:
- Enable transfer encryption: Select this checkbox to enable the encrypted transfer between different servers.
Note: This option is configurable for remote replication tasks only. - Use the time in the GMT +0 time zone to name the snapshots: You can select or unselect this checkbox to set snapshot naming policy.
- When you select this checkbox, snapshots will be named after the Greenwich Mean Time (GMT) upon being taken. If your shared folders are accessed by users in different time zones, or if your replication tasks are run across different time zones, we recommend using this option to avoid misleading time information in snapshot names.
- When you unselect this checkbox, snapshots will be named after local time upon being taken. You can set the date and time of your Synology NAS in Control Panel > Regional Options.
- Enable transfer encryption: Select this checkbox to enable the encrypted transfer between different servers.
- Click OK to apply the new settings.
Note:
- You can only edit the replication task on the source.
- Certain tabs may not be available if the settings cannot be applied to some of your multiple-selected replication tasks.
- Changing the snapshot naming option will affect the equivalent configuration in the Snapshot page.
- If you want to change the retention settings of your shared folders, please go to the Snapshot page.
To view information on a shared folder replication:
- Select the shared folder replication task you wish to view.
- Click Info.
- You will see a window containing the following information:
- Status of this replication.
- Statistics of this replication.
- Topology of this replication.
To run the syncing of a shared folder replication:
- Select the shared folder replication you wish to sync.
Note: You can press and hold Ctrl or Shift to select multiple items. - Click Action > Sync.
- Enter the description in Description of the snapshot to be taken.
- Select/unselect the Lock checkbox to prevent this replicated snapshot from being automatically removed when the automatic removal is triggered.
- Select the Immutable snapshots checkbox and set a Protection period. This function prevents this replicated snapshot from being removed for a specified period. We recommend setting this period to between 7 and 14 days.
Note: Once the Immutable snapshots checkbox is selected, you cannot unselect it. This option will be automatically unselected by the system when the protection period ends. - Click OK to confirm the action.
Note:
- If the available space of the volume on either the source or destination server is less than 100 MB, you cannot run the syncing tasks.
- You can only run the syncing task on the source.
- When the syncing is complete, the replicated shared folder on the destination will be updated, and you will thus see the restoration information in Log.
- If an encrypted shared folder is mounted on the destination server, you need to unmount it before running sync tasks and remount it afterwards to see the new data on the destination server.
To stop the syncing of a shared folder replication:
- Select the syncing share folder replication you wish to stop.
Note: You can press and hold Ctrl or Shift to select multiple items. - Click Action > Stop.
- You will see a confirmation message. Click Stop to confirm the action.
To export the initial copy from a replication task for a shared folder:
- Select the shared folder replication task of which you wish to export the initial copy.
Note: You can press and hold Ctrl or Shift to select multiple items. - Click Action > Export.
- Select the destination to which to export the initial copy.
To import the initial copy to a replication task for a shared folder:
- Select the shared folder replication task for which you wish to import the initial copy.
Note: You can press and hold Ctrl or Shift to select multiple items. - Click Action > Import.
- Select the source from which to import the initial copy.
LUN
For the best user experience, it is recommended to install the same version of Snapshot Replication on your source server and destination server.
Important:
Snapshot Replication supports the following LUN types:
- Standard LUN with storage acceleration: Storage acceleration must be enabled. This kind of LUN settings was previously known as advanced LUN in DSM 6.1 and earlier.
- Advanced LUN on Btrfs volume: Available from DSM 6.2 onwards, this type of LUN is created on the Btrfs file system (recommended).
To create a replication task for a LUN:
- Go to the LUN tab.
- Click Create.
- You will see the Create Replication Task wizard. Choose the way you wish to manage your replication task from the following:
- Synology Snapshot Replication
- VMware vCenter Site Recovery Manager
- Follow the steps of the wizard to create a LUN replication.
Note: If the destination server is a dual-controller model, you can click on the Advanced Settings button on the Specify the replication destination server in the wizard, and select Enter additional information for a dual-controller model to enter another controller's information.
Note:
- The LUN must be created as a Standard LUN with storage acceleration or an Advanced LUN.
- An Advanced LUN can only be replicated to a Btrfs volume.
- You can create one-to-many/extended replications for a LUN to at most 3 different destinations. However, each LUN can have only one remote replication task to each destination server.
- The maximum number of replication tasks is limited to 32. For more information, please refer to the Technical Specifications.
- Once a replication task has been created, you can no longer change the way to manage it.
- The LUNs used by Cinder cannot be replicated.
- The ports 3261 and 5566 are reserved for data transfer of LUN replications. If the source and destination servers are connected to different routers, you must set up port forwarding first.
- Snapshots that are not taken during the allowed transfer time will be transferred once entering allowed time.
Manage your replication with VMware vCenter Site Recovery Manager
- vCenter Site Recovery Manager™ is the framework released by VMware® to provide disaster recovery management solution. It helps you to plan, test, and run the recovery of virtual machines. vCenter Site Recovery Manager supports not only its natively associated vSphere Replication, but also array-based replications.
- With Synology Storage Replication Adapter (SRA), vCenter Site Recovery Manager can be integrated with Synology's storage array-based replication products. Your replication task will be created on your source, and leverage Synology SRA to retrieve and process the commands from vCenter Site Recovery Manager. You must install Synology Storage Replication Manager (SRA) first to proceed with creating a disaster recovery plan on the user's interface of vCenter Site Recovery Manager.
- If you have chosen to manage your replication task with vCenter Siter Recovery Manager, some operations of your replication task will be disabled in Synology Snapshot Replication (e.g., Recovery, Test Failover, et cetera). Please login to vCenter to manage the disaster recovery plan with the user's interface of vCenter Site Recovery Manager.
To delete a LUN replication:
- Select the LUN replication task you wish to delete.
Note: You can press and hold Ctrl or Shift to select multiple items. - Click Action > Delete.
- You will see a confirmation message. Click Delete to confirm the action.
To edit a LUN replication:
- Select the LUN replication task you wish to edit.
Note: You can press and hold Ctrl or Shift to select multiple items. - Click Action > Edit.
- You will see a window containing the following tabs:
- Partner Server
- Schedule
- Advanced
- In the Partner Server tab, you can edit the partner server information, including the hostname, username, and password. Click Advanced Settings to further edit your LUN replication task:
- Partner Server tab: If you have customized port forwarding rules, you can modify the ports that this server uses to connect to the partner server.
- Source Server tab: If you have customized port forwarding rules, you can modify the IP and ports that the partner server uses to connect to this server.
Note: You can leave the IP in Source Server blank to automatically detect the available IP to be connected by the partner server. - Enter additional information for a dual-controller model button: If the server is a dual-controller model, you can enter another controller's information here.
- In the Schedule tab, you can configure the following options:
- Replication schedule: Select the Enable replication schedule checkbox, and set up the time and frequency of the task.
- Timeout notification setting for the scheduled sync: You will be notified when the time of scheduled sync exceeds the waiting time.
Note: If you set the waiting time as 0, the system will not send any timeout notifications. - Only send snapshots within the transfer window: You can set a transfer window that allows snapshot transfers only during off-peak hours. By doing so, you can reduce the impact of snapshot transfer on system performance. Any incomplete transfers will be resumed during the next allotted time period.
- Immutable snapshots: Select this checkbox and set a Protection period. This function prevents replicated snapshots from being removed for a specified period. We recommend setting this period to between 7 and 14 days.
- In the Advanced tab, you can configure the following options:
- Enable transfer encryption: Select this checkbox to enable the encrypted transfer between different servers.
- Enable application-consistent snapshots: You can select/unselect this checkbox to enable/disable application-consistent snapshots.
- Click OK to apply the new settings.
Note:
- You can only edit the replication task on the source.
- Certain tabs may become unavailable if the settings cannot be applied to some of your multiple-selected replication tasks.
- Changing the application consistency settings will affect the equivalent configuration in the Snapshot page.
- If you want to change the retention settings of your LUNs, please go to the Snapshot page.
To view information on a LUN replication:
- Select the LUN replication task you wish to view.
- Click Info.
- You will see a window containing the following information:
- Status of this replication.
- Statistics of this replication.
- Topology of this replication.
To run the syncing of a LUN replication:
- Select the LUN replication task you wish to sync.
Note: You can press and hold Ctrl or Shift to select multiple items. - Click Action > Sync.
- Enter the description in Description of the snapshot to be taken.
- Select/unselect the Lock checkbox to prevent this replicated snapshot from being automatically removed when the automatic removal is triggered.
- Select the Immutable snapshots checkbox and set a Protection period. This function prevents this replicated snapshot from being removed for a specified period. We recommend setting this period to between 7 and 14 days.
Note: Once the Immutable snapshots checkbox is selected, you cannot unselect it. This option will be automatically unselected by the system when the protection period ends. - Click OK to confirm the action.
Note:
- If the available space of the volume on either the source or destination server is less than 1 GB, you cannot run the syncing tasks.
- You can only run the syncing task on the source.
- When the synchronization is complete, the replicated LUN, which is located on a Btrfs volume and has the snapshot feature enabled, will be updated on the destination, and you will thus see the restoration information in Log.
To stop the syncing of a LUN replication:
- Select the syncing LUN replication task you wish to stop.
Note: You can press and hold Ctrl or Shift to select multiple items. - Click Action > Stop.
- You will see a confirmation message. Click Stop to confirm the action.
To export the initial copy from a replication task for a LUN:
- Select the LUN replication task of which you wish to export the initial copy.
Note: You can press and hold Ctrl or Shift to select multiple items. - Click Action > Export.
- Select the destination to which to export the initial copy.
To import the initial copy to a replication task for a LUN:
- Select the LUN replication task for which you wish to import the initial copy.
Note: You can press and hold Ctrl or Shift to select multiple items. - Click Action > Import.
- Select the source from which to import the initial copy.
Concurrent Tasks
You can configure the number of concurrent tasks to better allocate system resources. If you want to achieve better synchronization efficiency, set the concurrent tasks to a higher value. Conversely, to reserve more system resources for other services during the synchronization, set the number to 1, which is also the default setting.
One-to-many/Extended Replication
You can create multiple replications for a shared folder/LUN to multiple destinations, forming a one-to-many scheme. You can also create an extended replication for a replicated shared folder/LUN, forming an extended scheme.
Note:
- Whether in a one-to-many or extended scheme, any replication task can have only three destinations at most.
Retention Policy
Setting a retention policy helps you manage your storage space more efficiently by keeping the snapshots you want. There are three options for retention policies to choose from:
- Numbers of latest snapshot to keep: Specify the number of the latest snapshots to retain.
- Keep all snapshots for: Retain all snapshots taken within certain days.
- Advanced retention policy: Snapshots can be kept for longer periods but your storage space can be saved at the same time.
- You can set multiple rules and customize the retention policy according to your needs.
- Retain all snapshots taken within certain days.
- Advanced retention policy also allows you to keep the latest snapshots of different time frames for certain periods. You can choose how long the hourly, daily, weekly, monthly, and yearly snapshots will be retained in the system. For example, Keep the latest snapshot of the week for 7 weeks means that the last snapshot taken during a week will be retained for seven weeks after it is taken.
- You will also need to set the Number of the latest snapshots to keep. If there are fewer snapshots than the specified number, the retention policy will not take effect. This is a required field.
- Advanced retention policy employs the GFS, or Grandfather-Father-Son, retention mechanism.
- A snapshot can meet more than one retention rule at a time. For example, a snapshot can be retained by the weekly retention rule and daily retention rule at the same time.
- You can set multiple rules and customize the retention policy according to your needs.
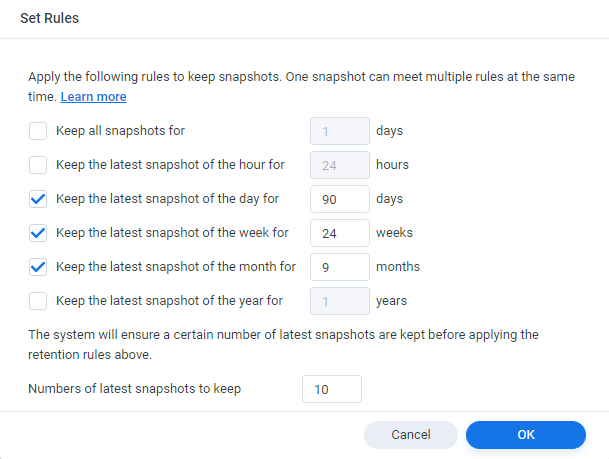
Example
It's October now and you have a snapshot schedule that takes one snapshot every day. If you are planning for a retention policy that covers the past nine months and want to keep
- Daily snapshots for the first 3 months (September, August, and July)
- Weekly snapshots for the 4th to 6th months (June, May, and April)
- Monthly snapshots for the 7th to 9th months (March, February, and January)
- 10 latest snapshots
you may refer to the following settings:
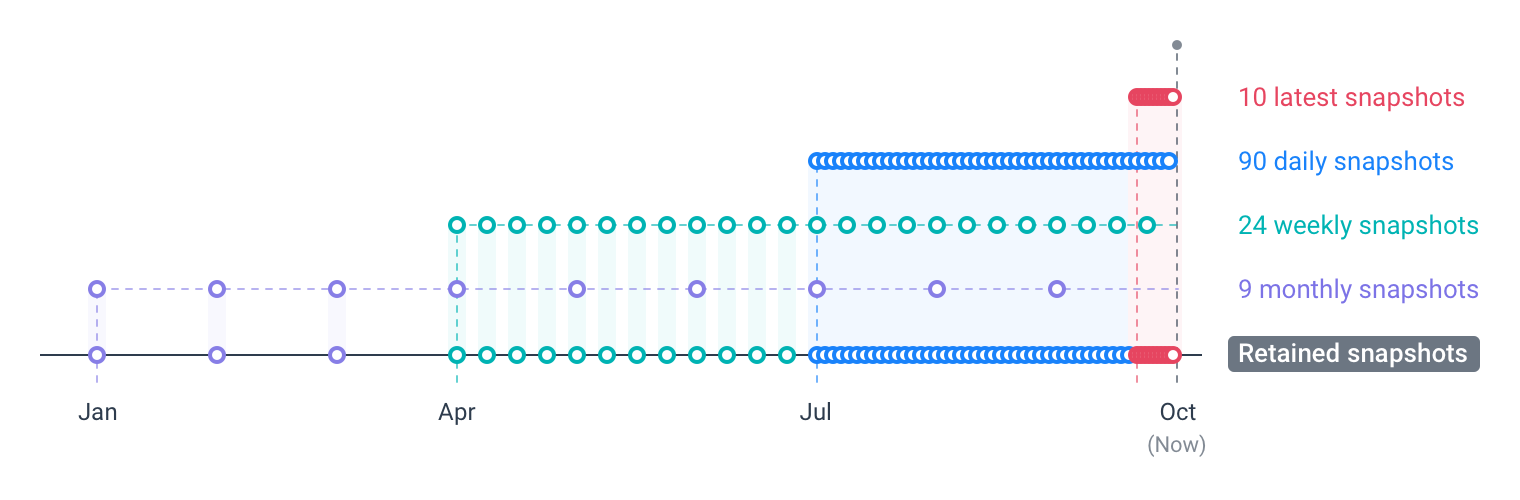
A snapshot can meet more than one retention rule. Therefore, the first weekly snapshot can also be the seventh daily snapshot, and the first monthly snapshot can also be the fourth weekly snapshot.
Setting the Number of latest snapshots to keep prevents the retention policy from deleting all snapshots when the system stops taking new snapshots, and the 10 latest snapshots will be the daily snapshots taken in the past 10 days.