Synology SSL VPN
Synology SSL VPN is a VPN service that supports SSL/TLS authentication and encryption. It offers fast and secure VPN access to web pages, files, and applications on the Internet or local networks.
General Management
To set up Synology SSL VPN:
- Go to VPN Plus Server > Synology VPN > SSL VPN.
- Tick Enable Synology SSL VPN.
- Specify the settings below:
- Active licenses: Check the number of your active licenses for the premium features. To add licenses, go to License on the left panel.
- Client IP range: Select a client IP range (i.e., a subnet or an IP range behind your Synology Router) as virtual IP addresses available for clients. To add more subnets or IP ranges, go to Object > Address Pool.
- Self-owned domain name: Click Edit to configure the Domain Settings.
- Port: Specify the port for connections via this protocol. The default port is 443. If Synology SSL VPN and WebVPN are both enabled, we recommend not using port 443 for Synology SSL VPN lest the speed of WebVPN be affected.
- Security level:
- Auto: This is the default option, and is recommended for better compatibility with web browsers. Also, it automatically adjusts encryption methods to the ones that best apply to client devices.
- Modern compatibility: This security level adopts up-to-date cipher suites for your VPN connections. Please note that it supports TLS 1.3 web browsers only.
- Disallow duplicate logins: Tick this checkbox to prevent accounts from creating multiple connections via this protocol.
- Enable split tunneling: This option allows clients to access resources within specified local subnets or IP ranges through VPN, while the rest of traffic goes through the default gateway. Click Edit to add objects (i.e., subnets or IP ranges) to the Split-tunnel List.
- Click Apply to finish the setup. A customized URL for the VPN Plus web portal will show at the bottom of this page.
Note:
- The URL for the VPN Plus web portal may appear in one of the following forms:
- Internal IP address: Only local users can access the web portal via this URL, e.g., "https://192.168.1.2:443". You can manually replace it with the external IP address to have a URL that allows remote access, and also add the port number to it if a non-default port is used.
- External IP address: Local and remote users can access the web portal via this URL.
- Domain name: Local and remote users can access the web portal via this URL, e.g., "https://example.synology.me:443". To have a domain-name URL, match the external IP address with the domain name on the DNS server first, or use the Synology DDNS service (see instructions). If the default port 443 is not used, add a non-default port number (e.g., 500) to the domain name (e.g., "example.com:500").
- The object specified in the Client IP range field will be added to the Split-tunnel List and cannot be removed. To remove this object, please select another object in the Client IP range field.
- If you wish to use your Synology SSL VPN with the modern compatibility (security level), please check the following on your client devices:
- Your Synology SSL VPN Client is up to date.
- Your web browser supports TLS 1.3.
- SSTP VPN will be unavailable if you select Modern compatibility for the security level. To use SSTP VPN and SSL VPN simultaneously, please switch the security level to Auto.
To install a third-party certificate to the Synology Router:
The network administrator can purchase a certificate from a trusted third party and install it to the Synology Router. After installation, all clients can smoothly access the VPN Plus web portal without browser alerts.
- Go to SRM Control Panel > Services > Certificate.
- Under the Action section, click Import Certificate.
- Click Browse and provide the acquired private key and certificate.
- Click OK to import the certificate.
To install the Synology Router certificate to client devices:
If no trusted third-party certificates are available, the network administrator can create a self-signed certificate from the Synology Router, and install it on all client devices.
- Go to SRM Control Panel > Services > Certificate.
- Under the Action section, click Create Certificate > Create self-signed certificate. Follow the on-screen instructions in the wizard to create a certificate for the VPN Plus web portal.
- Under the Server certificate section, click Export Certificate to download the self-signed certificate.
- Share this certificate with local users. Ask them to install it on their devices as instructed in the Usage Guide.
Usage Guide
In this section, you will learn how to connect your client devices to Synology SSL VPN.
To connect to Synology SSL VPN:
Web browsers on computers (except for Firefox):
- Launch a web browser and enter the VPN Plus web portal URL in the address bar.
- Sign in with your SRM credentials.
- Click SSL VPN on the left panel.
- Click Download to install Synology SSL VPN Client to your local computer.
- Follow the on-screen instructions in the wizard to finish the installation.
- When the SSL VPN client starts running, the web page will refresh automatically.
- Click Connect to connect via Synology SSL VPN. (See the Note below.)
- Now all your connections from the local computer will go through the Synology SSL VPN.
- To stop using this VPN service, click Disconnect on the VPN Plus web portal.
Firefox on computers:
- Launch Firefox and enter the VPN Plus web portal URL in the address bar.
- Sign in with your SRM credentials.
- Click SSL VPN on the left panel.
- Click Download to install Synology SSL VPN Client to your local computer.
- Follow the on-screen instructions in the wizard to finish the installation.
- Go back to the VPN Plus web portal > SSL VPN, and click on the here button to add a security exception for the browser.
- A browser alert will display on the web page. Click Advanced... > Accept the Risk and Continue.
- Click Proceed. Now all your connections from the local computer will go through the Synology SSL VPN.
- To stop using this VPN service, click Disconnect on the VPN Plus web portal.
Note:
- Before the VPN connection, if it is the first time you sign in to the VPN Plus web portal on a client operating system, you will need to set up a PIN code of at least 8 characters. This mechanism avoids unauthorized login to a malicious VPN server.
- Once you set up the PIN code, you need to enter the PIN code again when connecting to another VPN server for the first time on the same client operating system.
- The PIN code cannot be changed once the VPN has been set up. If you forget your PIN code or wish to change it, you must uninstall Synology SSL VPN Client and install it again.
iOS/Android devices:
- Download and install Synology VPN Plus (Apple App Store/Google Play) on your mobile device.
Note: Android application package (APK) is also available on Synology's Download Center. For more information on how to manually install the application on your Android device, please refer to this article. - Open Synology VPN Plus, enter the IP address or the domain name (e.g., "vpn.service.com") of your Synology Router.
Note: If you use a custom port other than 443, please add the port number after the domain name/IP address with a colon (e.g., "prefix.domain.com:10001"). - Sign in with your SRM credentials.
- Tap Connect to connect via Synology SSL VPN.
- Now all your connections from the mobile device will go through the Synology SSL VPN.
- To stop using this VPN service, tap Disconnect.
Note:
- The Synology SSL VPN service has only two compatible clients: Synology SSL VPN Client and the Synology VPN Plus mobile app.
- Synology SSL VPN Client and the Synology VPN Plus mobile app are only compatible with VPN Plus Server.
- If the network administrator has enabled split tunneling, only traffic to destination web pages/applications/servers within specified local subnets or IP ranges will go through the VPN. The rest of the traffic will go through the default gateway.
To install a certificate on your device:
If no trusted third-party certificates are available on VPN Plus Server, you can download and install a self-signed certificate on your computer to avoid repeated browser alerts.
- Go to the VPN Plus web portal.
- Click the person icon in the upper-right corner.
- Click Configurations.
- In the pop-up window, click Download to download the ca.crt certificate to your computer.
Follow the steps below to install the certificate according to your computer's operating system.
For Windows:
- Double-click the ca.crt file on your computer.
- Click Open > Install Certificate... > Next.
- Select Place all certificates in the following store.
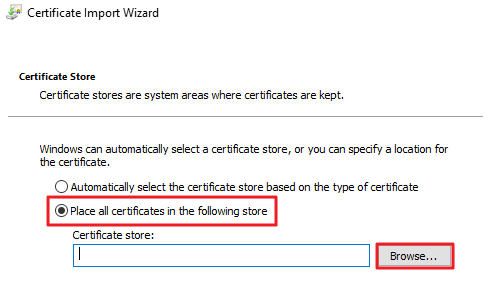
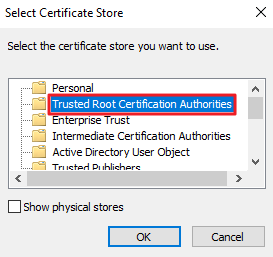
- Click Browse and choose Trusted Root Certification Authorities.
- Click OK and follow the on-screen instructions in the wizard to finish the installation.
- Reopen the browser to make the certificate take effect.
For Mac:
- Double-click the ca.crt file on your computer.
- Select System for Keychain, and click Add.
- Enter the user credentials and click Modify Keychain.
- Open Keychain Access on your Mac computer.
- On the left panel, select System under Keychains and then select Certificates under Category.
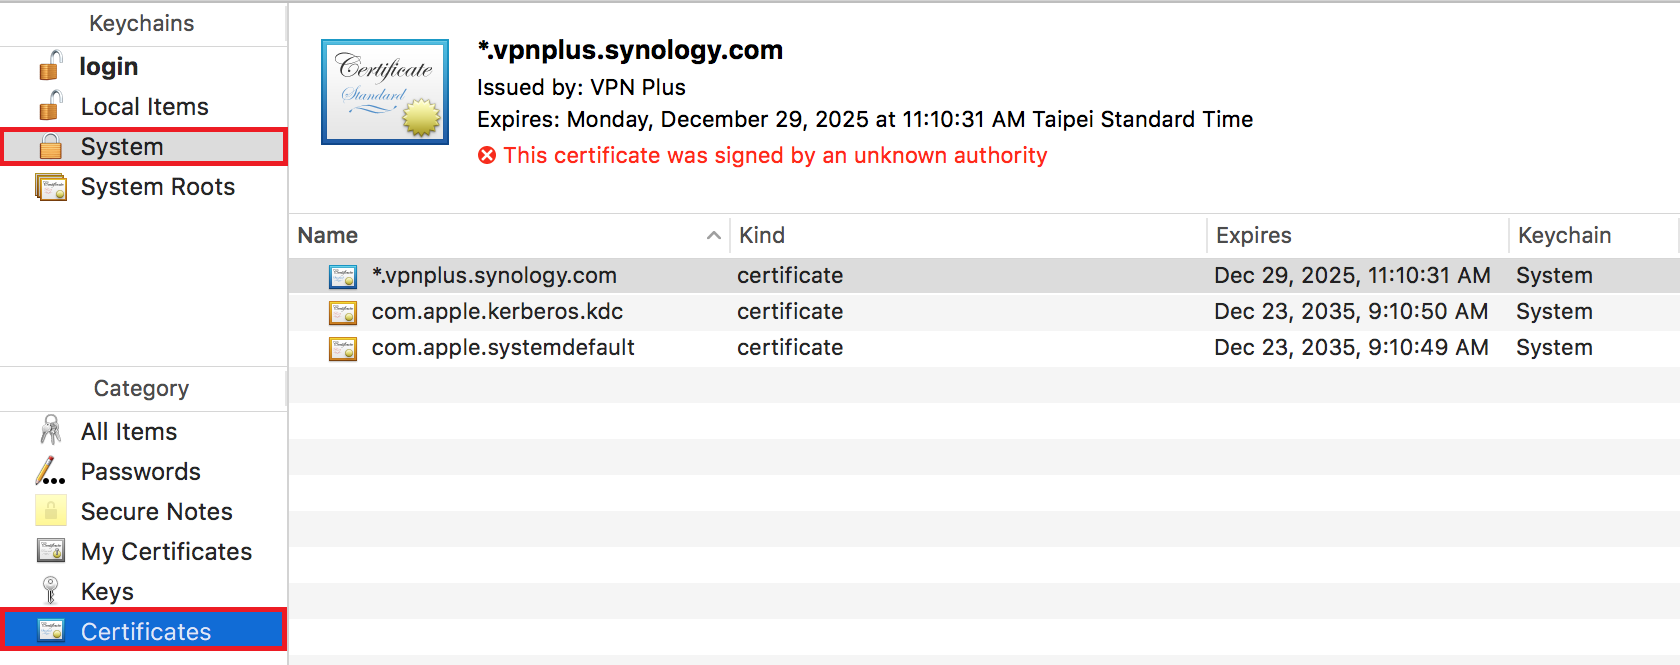
- Find and double-click the certificate.
- In the pop-up window, click Trust, and select Always Trust for When using this certificate.

- Close the pop-up window and follow the on-screen instructions to finish the installation.