DS cam iOS
Version 5.9
DS cam enables monitoring, alert notifications, and real-time control of surveillance cameras on your Synology server.
Before You Start
Make sure you have DSM and Surveillance Station 7.0 or above installed on your Synology server.
Note:
- DS cam does not support Split View.
- Configurations for 3rd party cameras can only be managed from a computer with access to Surveillance Station. This includes the push notification service.
- You need to have sufficient permissions to delete, download, lock/unlock recordings, smart time lapse recordings, and snapshots.
Sign-in and Sign-out
Sign in to Surveillance Station with DS cam
- If you are signing in for the first time:
Tap Sign In and enter the following information on the login page.- Address or QuickConnect ID of the Synology server: This can be either the internal or external IP address, DDNS hostname, or Synology QuickConnect ID. Before signing in with your QuickConnect ID, make sure it is enabled at DSM > Control Panel > External Access > QuickConnect. You can also tap on the search icon to find Synology servers in your local network.
- Your user account and password.
- Sign in via HTTPS: This option allows you to secure your connection with SSL/TLS encryption. DS cam will check if the SSL certificate on your Synology server is trusted. You can establish a trusted connection for free or purchase from a third-party issuer. If the server's certificate is not issued by a trusted certificate authority, you can manually trust the certificate and proceed with the login manually.
- If you have signed in before:
IP addresses (or QuickConnect ID/hostnames) and user accounts are shared between the login histories of the different Synology mobile apps. By default, DS cam will save your last login. You can also tap Use another account below the sign-in field to select previous login credentials from your login history or find Synology servers in your local network. To remove a credential from the list, tap on the more icon.
Troubleshoot login issues
If you are unable to sign in, do the following:
- Sign in to DSM as admin (or a user belonging to the administrators group), and go to Control Panel > Privileges to check whether the user account has permissions to use Surveillance Station.
- Check if Surveillance Station is using a customized port. For example, if the port is 9920, you may need to add the port to the IP address/DDNS hostname as in "fun.syno.com:9920".
Sign out of DS cam
Tap  from the left panel and then tap Logout.
Navigating DS cam
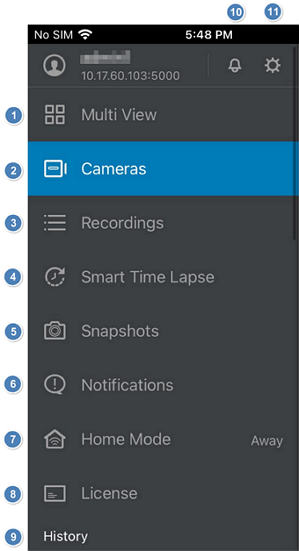
- Watch multi-view camera live view and timeline.
- Watch the live feed, recordings, and status of each camera.
- Access stored recordings.
- Access stored Smart Time Lapse recordings.
- Access stored snapshots.
- Receive push notifications via DS cam when event notifications are triggered by IP cameras or Surveillance Station.
- Check and modify Home Mode and Auto Switch settings.
- Manage licenses installed on your Synology server.
- Switch between users or Synology servers quickly.
- Modify push notification settings.
- Check your login information, sign out of DS cam, adjust preference settings, and read related documents.
Settings
Tap  from the left panel to go to Settings. The page allows you to check your login information, sign out of DS cam, adjust preference settings, and read related documents.
Adjust user preferences
- H.264 hardware decoding: Use the device’s built-in decoding functions for smoother video streaming and reduced CPU loading. This setting only affects H.264 cameras; H.265 cameras will always use hardware decoding.
- Camera info display: Show/Hide detailed camera information in both multi-view and single-view players.
- Floating player: A floating player appears in the bottom right corner that continues playback even when you leave the page.
- Continuously play recordings: Continue to play the next recording after one ends.
- Start page settings: Select a page to display upon login.
- Screen Mirroring (AirPlay): Select whether to mirror the whole screen or only the video.
Modify timeline settings
- Show shortcut icons only: View or hide the titles of buttons on the shortcut panel.
- Smart timeline: Enable auto-resizing of timeline scales according to your scroll speed.
Protect your DS cam with a passcode
Go to the Settings page and tap Configure passcode to manage the passcode lock. Once configured,a 4-digit passcode will be required whenever you open DS cam. You can also set a passcode timeout to determine when DS cam asks for the passcode again. Touch ID is supported; the passcode will still be required if your fingerprints cannot be recognized.
Manage trusted connections on this device
Go to Settings , then tap Manually Trusted Connection to view information about connections that you have manually trusted on this device. You can manually remove connections in the Trusted Connection List, except for those currently in use.
Multi View
In the Multi View page, you can watch live views and check out recordings of multiple cameras simultaneously. Tap on a single channel to see its footage individually. The quality of live view depends on your available bandwidth. We recommended using wider bandwidth for live view.
Modify the Multi View layout
Go to the Multi View page and tap  . Select which layout style to use by tapping
  ,
,  ,
,  , or
, or  , and tap Select to determine which cameras to display.
Download recordings in Multi View layout
In the Multi View page, tap  . and then tap Download to select and preview the video download range. Videos from each camera will be downloaded as separate files. The maximum video download range is 4 hours; the minimum is 10 seconds.
To operate Multi View player
In the Multi View page, tap  or
or  to show/hide the timeline and shortcut panel. To play recordings from a specific time, drag the timeline bar to the desired moment. The smart timeline will automatically adjust the timescale, or you can manually adjust it by pinching the bar.
On the shortcut panel of the player, you can scroll left/right and use these buttons to make adjustments.
Note:
- Player buttons can only be seen if your camera supports the corresponding functions.
- Timeline in Multi View only supports sync-mode.
-
To hide the titles of each shortcut button, tap
 from the left panel, and enable Show shortcut icons only.
-
If you do not want the timescale to resize automatically, tap
 from the left panel, and disable Smart timeline.
To mute all sounds from cameras
On the Multi View page, tap a channel and then tap  .
.
Mirror your iOS device to an Apple TV (AirPlay)
- Connect your Apple TV to the same Wi-Fi network as your iOS device.
- Open Control Center on your iOS device and tap Screen Mirroring.
- Select your Apple TV. If needed, enter the passcode on your iOS device.
- Tap
 from the left panel. Under User Preferences, tap Screen Mirroring (AirPlay), and determine whether to mirror the entire screen or to only play videos.
Cameras
View the camera list
The Cameras page to will display a list of all the cameras added to your Surveillance Station. Tap  to set up filter rules to quickly find the device you are looking for.
If you wish to switch between camera list-view and thumbnail-view, tap  > Switch display style. If you wish to reorder the cameras according to your needs, tap
  > Change camera display order, and use the icons to make adjustments.
Add new cameras
To add non-Synology cameras, sign in to your Surveillance Station and go to IP Camera.
To add Synology Camera devices:
- Tap
 and select your camera type. DS cam will automatically search for and display all Synology Camera devices on the same local network that have not been added yet. If you are adding wireless Synology Camera devices, turn on Bluetooth.
 - The list will show the following information for each camera found: model number, serial number, and IP address. You can use the search bar to refine the search results .
- Set up cameras:
- For wireless cameras:
- Select one or more cameras, or tap Select all to add all cameras. If your camera is not on the list, you can connect your camera to the Wi-Fi using a QR code or add the camera manually.
- Select a Wi-Fi network from the list, or specify your Wi-Fi information if your SSID is hidden. The following encryption types are supported: None, WPA-Personal, WPA2-Personal, and WPA3-Personal.
- Adjust network details such as the DHCP server if necessary. If the camera is unable to establish a connection with Surveillance Station, a message will ask you if you want to try Smart Connection, which will then attempt to set up port forwarding on your router. If smart connection fails or you opt out this function, you can reconnect the camera manually afterwards.
- For wired cameras:
- Select one or more cameras, or tap Select all to add all cameras. If you want to add cameras that are in a different network, you can scan the QR code on your camera's rear, or manually enter the camera's IP address and port.
- For wireless cameras:
- Initialize or authenticate your cameras.
- Initialize: Before using new cameras, you need to configure them with an account name and password.
- Authenticate: Enter the account name and password to authenticate the camera. You have the option to do this later if you prefer.
- Preview the list of cameras you're adding. You can remove certain cameras from the list or go back to the previous steps to add more cameras.
- Manage the cameras' Recording Storage and Recording Settings.
Note:
- Cameras that have already been configured with an account name and password (i.e., initialized) will have the
 icon.
icon. - When initializing multiple cameras simultaneously, the same account and password will be used for all.
- If you select multiple cameras with varying accounts and passwords, enter the credentials for any camera. Cameras with the same credentials will be authenticated together, and those with different credentials can be authenticated in a subsequent step.
Connect a Synology Wireless Camera using QR code
If the wireless camera is unable to connect to the Wi-Fi network via Bluetooth, you can generate a QR code.
- Tap Try another method, and select Scan QR Code.
- Enter the information of your Wi-Fi network and tap Generate QR Code when you are ready to proceed. If your network's SSID is hidden, tap Specify security type to specify your security settings.
- Place the QR Code 15-20 cm (or around 7") in front of the camera lens. You will hear "Connected" once the camera successfully connects to your network.
- Select your camera from the list.
- Initialize or authenticate your cameras.
Add your Synology Wireless Camera manually to Surveillance Station
- Click Try another method, and select Add Manually.
- Enter the required information and click Add. Your camera will then add to the camera list.
- Initialize or authenticate your cameras.
- Manage the Recording Storage and Recording Settings.
Troubleshoot a disconnected Synology Wireless Camera
Ensure your camera is powered on. If it remains disconnected, do the following:
- Select your target Synology Camera, tap
 and choose Edit Connection.
 - Tap Camera Wi-Fi Information. From here, you have the option to connect your camera via Bluetooth. If you're unable to connect via Bluetooth, select Scan QR Code.
- Enter the account name and password to authenticate the camera.
- Select a Wi-Fi network from the list, or add your own network if your SSID is hidden.
If your camera and Synology NAS are on different subnets within the same local network, do the following:
- Select your target Synology Camera, tap
 and choose Edit Connection.
 - Tap Try Smart Connection and click OK to grant permission to automatically set up port forwarding on your router.
If your camera and Synology NAS are on different network segments over the Internet, you can set up port forwarding on your router:
- Select your target Synology Camera, tap
 and choose Edit Connection.
 - Manually input the camera’s network information.
Note:
- If the Smart Connection is unable to set up port forward, please check the settings of your router to manually set up port forwarding.
Operate single-view player
Go to the Cameras page and tap on a camera to see its live view and recordings. To play recordings from a specific time, drag the timeline bar to the desired moment. The smart timeline will automatically adjust the size of the timescale, or you can manually adjust it by pinching the bar. On the shortcut panel of the player, you can scroll left/right and use the following buttons to make adjustments:
- Pause/Play: Tap
 or
or  to freeze/resume all camera channels.
 - Speed: Tap
 to select a speed to playback recording files.
 - Jump to: Tap
 and scroll the calendar to see footage of a certain date and time.
 - Live view: While in Live View mode, the
 button will be blue. When playing recordings, you can tap this button to go back to watching live view immediately.
 - Switch events: Tap
 or
or  to see the previous/next recording and quickly find important events.
 - Quick seek: Tap
 or
or  to go backward/forward 10 seconds. Double-tap on the left/right edges of the recording player to perform quick seek.
 - Optical zoom: Tap
 or
or  to zoom in/out and adjust the focal length for clearer images.
 - Timescale: Tap
 and
and  to adjust the size of the timescale to your preferred size. You can also pinch the timeline to adjust the scale or drag the bar to a specific time and play recordings.
 - Rewind: Tap
 to play recordings backward.
 - Snapshots: Tap
 to take snapshots of the current video feed.
 - PTZ: Tap
 to open the PTZ (pan, tilt, zoom) control window.
 - Microphone: Tap
 or
or  to start/stop audio output.
 - Manual access: Tap
 to allow access to intercom doors.
 - Fixed aspect ratio: Tap
 to fix the camera screen display to avoid image distortion.
 - Edit: Tap
 to open the Edit window. You can determine which buttons to display on the shortcut panel and use
  to modify the display order.
Note:
-
To hide the titles of each shortcut button, tap
 from the left panel, and enable Show shortcut icons only.
-
If you do not want the timescale to resize automatically, tap
 from the left panel, and disable Smart timeline.
Adjust the movement of the camera during live view
On the live view of any camera, you can adjust the camera’s movement through on-screen or finger controls. The PTZ (pan, tilt, zoom) function is subject to the camera's capabilities. Zooming on a PTZ camera involves optical zoom, and uses an actual lens adjustment for a close-up. Non-PTZ cameras use digital zoom, which simply enlarges the image but reduces the quality.
- For cameras that support PTZ controls, tap
 or
or  from the shortcut panel to open the PTZ control window:
- Use
 /
/  /
/  /
/  to adjust the angles.
 - Tap
 to reset camera view to its Home position.
 - Tap
 or
or  to zoom in/out.
- Use
- For non-PTZ cameras, pinch your fingers together or apart to zoom in or out.
Note:
- Only existing patrol paths created on Surveillance Station can be applied to the live view of DS cam. To set or modify patrol paths, please sign in to Surveillance Station to make changes.
Mute all sounds from cameras
On the Camera page, tap a camera and then tap  .
.
Record videos during live view
On the live view of any camera, tap  on the camera screen first, then tap
  to start recording videos.
View recordings
Go to the Camera page and tap on your target camera. The recordings stored on your Synology server will be displayed on the Recordings page. Tap  if you only wish to view clips of triggered events.
Enable or disable a camera
Go to the Cameras page, tap  and select Disable or Enable. You will not be able to watch the live view of a camera once it has been disabled.
Download recordings of a camera
Go to the Camera page, tap on your target camera, tap  and then tap Download to select and preview the video download range. Recordings will be downloaded as a single file. On the Recordings panel, you can also swipe left on your target recording and tap Download. The time range of the selected recording will be used as the download range by default.
The maximum video download range is 4 hours; the minimum is 10 seconds.
Use Instant Search to quickly find specific Synology Camera events
- Tap on a selected camera, then tap either
 or the
  icon on the top-right corner.
 - Select either People, Vehicle, or Motion.
- On the grid, drag and drop to highlight a specific search area.
- A list of videos matching targeted detection events will be displayed.
Adjust streaming or audio settings for a Synology Camera
Select your target Synology Camera, tap  , then tap Streaming Format. Choose between two stream profiles: High quality and Balanced.
For each stream profile, tap Settings to configure the resolution, frame rate (FPS), bitrate, and image quality.
You can also choose to enable Audio, with the option to filter out environmental noise.
Edit Image Settings or set up privacy masks for a Synology Camera
Select your target Synology Camera, tap  , then tap Image Settings.
Tap the following icons to adjust video orientation:
 : Flip horizontally
 : Flip vertically
 : Rotate 90 degrees clockwise
 : Rotate 90 degrees counterclockwise
Tap Adjust Image to configure more image color and exposure options.
In the Color page, you can adjust the brightness, contrast, saturation and sharpness.
You can also choose to use Auto white balance or manually adjust the blue or red balance.
In the Exposure page, you can adjust the HDR, image noise reduction, exposure control, shutter range, and gain range.
For indoor videos, we recommend enabling Flicker-free exposure control to avoid stroboscopic effects. Check the power frequency of the country you are located in and select the appropriate option (Flicker-free 50HZ or Flicker-free 60HZ).
To add date or customized text to the video, tap Overlay. You can display the time, date, or customized text in a position of your choice.
Conceal parts of an image from view with a masked area by tapping on the toggle for Privacy masking. For more options, tap Edit privacy mask.
The privacy mask can be embedded into the video stream or only applied to the camera view. Tap Add Zone to add up to 5 privacy masks for a single camera. The size and position of a privacy mask can be adjusted by dragging the nodes on the screen.
Adjust recording settings of a Synology Camera
Select your target Synology Camera, tap  , then tap Recording Settings.
Tap Basic Settings to adjust Recording Setting and Recording Storage. Under Recording Settings, you can adjust the pre and post recording time and enable rotations (by time or capacity).
Under Recording Storage, you can adjust the server and recording storage.
Recording Schedule allows you to configure schedules for different recording modes (system default is continuous recording). For each mode, tap on the corresponding Settings to select a stream profile or an event detection type.
Tap Edit Recording Schedule, select one or more days and tap Edit Schedule to set the recording schedule for those days. In the Edit Schedule page, select a recording mode, then highlight the times you want to use that recording mode by dragging your finger on the bar to the right.
Note:
- If you select the Customize1/Customize 2 recording modes, recording will take place when a custom event is triggered during this time period. Custom events can be events triggered by Motion detection, Tampering detection or Audio detection. Custom events can be configured at the Recording Settings page. You can also fine tune the frame range for event detection (for more information see Configure event detection settings).
Configure event detection settings for Synology Camera
Select your target Synology Camera, tap  , then tap Detection Settings. You can detect people and vehicles, intrusions, motion, audio, and tampering.
People and Vehicle Detection
People and Vehicle Detection sets up virtual detection zones and triggers events when people or vehicles are detected. Tap People and vehicle Detection to configure the following:
- Edit Zone: Tap to set up to three detection zones. Select Add or Remove to adjust the number of nodes on the screen, and you can drag the nodes to change the size and location of the detection area.
- Detection target: Determine whether to detect people, vehicles, or both.
- People:
- Loitering detection: Events will trigger When occupancy time of any person exceeds (sec.) a specified time (1-600 sec.)
- Crowd detection: Events will trigger when occupancy reaches a specified number (1-15).
- Ignore unmoving people: A stationary person in the detection area will not continuously trigger an event.
- Vehicles:
- Loitering detection: Events will trigger When occupancy time of any vehicle exceeds (sec.) a specified time (1-600 sec.)
- Ignore unmoving vehicles: A stationary vehicle will not continuously trigger an event.
- People & Vehicles:
- Record if the following rules are met: Record when an event is triggered if all or any conditions listed under people and vehicle detection are met.
For example, if the following is enabled:- People crowd detection
- People loitering detection
- Vehicles loitering detection
- Any: The camera will begin recording when it detects both crowds and people loitering, or only vehicles loitering.
- All: The camera will only begin recording if a crowd of people is detected, people are detected loitering, and a vehicle are detected loitering.
- Record if the following rules are met: Record when an event is triggered if all or any conditions listed under people and vehicle detection are met.
- People:
Intrusion Detection
Intrusion Detection sets up virtual fences and triggers events when objects cross over. Tap on the corresponding toggle to enable, then tap Edit detection settings to configure the following options:
- Edit Nodes: Tap to configure a virtual fence. Select Add or Remove to adjust the number of nodes on the screen.Drag the nodes to change the length and location of the fence.
- Detection direction: Determine the directions of the virtual fence.
- Two way: Trigger an event if the fence is crossed from either direction.
- One way: Trigger an event if the fence is crossed from the specified direction.
- Detection target: Detect people, vehicles, or both.
Motion Detection
Motion detection looks for movement in specified areas by tracking changes in object positions. Tap on the corresponding toggle to enable, then tap Edit detection settings to configure the following options:
- Edit Zone: Tap to set up a detection zone. Select Add or Remove, then drag on the grid to adjust the detection zone.
- Threshold: Specify the level of movement needed to trigger an event (1-99). The higher the threshold is, the harder to trigger an event.
- Sensitivity: Specify whether a big or small movement is needed to trigger an event (1-99). The higher the difference level, the easier to detect motion.
Audio Detection
Audio detection enhances your surveillance system’s security by actively listening for loud and unusual noises. Tap on the corresponding toggle to enable, then tap Edit detection settings to configure the following options:
- Threshold: Determine the volume level (1-99) required to trigger an event. The higher the value, the harder to trigger.
Tampering Detection
Tampering detection triggers alerts when the camera view is blocked or forcefully moved to other angles. Tap on the corresponding toggle to enable, then tap Edit detection settings to configure the following options:
- Sensitivity: Determine the percentage of camera view coverage (1-99) required to trigger an event. The higher the value, the harder to trigger an event.
Edit the name, network settings, account and password of a Synology Camera
Go to the Cameras page, tap on your target camera, tap  , and choose Manage Device.
Recordings
The maximum allowable resolution may vary depending on your mobile device. Refer to the product specifications of your mobile device for more information.
Access recordings
Go to the Recordings page to access the recordings stored on your Synology server. Tap  to set up filter rules to quickly find the video you are looking for.
DS cam supports the following formats for playback:
- Video: MJPEG, MPEG4, MxPEG, H.264, H.265, H.264+, H.265+
- Audio: G711, G726, PCM, AMR
Mute all sounds from cameras
On the Recordings page, tap a recording and then tap  .
.
Delete, download, or lock/unlock recordings
Tap  to select your target recordings, and then tap
  ,
,  ,
,  , or
, or  to perform the corresponding action.
Download recordings of a camera using a custom time range
On the Recordings page, tap on your target recording, tap  and then tap Download to select and preview the video download range. Alternatively swipe left on your target recording and tap Download. Recordings will be downloaded as video files. The time range of the selected recording will be used as the video download range by default.
The maximum video download range is 4 hours; the minimum is 10 seconds.
Smart Time Lapse
Make sure Smart Time Lapse is enabled on Surveillance Station > Application Center first. The maximum allowable resolution may vary depending on your mobile device; refer to the product specifications of your mobile device for more information.
Refer to Surveillance Station Help for more information about Smart Time Lapse settings.
Access smart time lapse recordings
Go to the Smart Time Lapse page to access the recordings stored on your Synology server. Tap  to set up filter rules to quickly find the video you are looking for.
Delete, download, or lock/unlock smart time lapse recordings
Tap  to select your target recordings, and then tap
  ,
,  ,
,  , or
, or  to perform the corresponding action.
Snapshots
Access snapshots
Go to the Snapshots page to access snapshots stored on your Synology server.
Delete, download, or lock/unlock snapshots
Tap  to select your target snapshots, and then tap
  ,
,  ,
,  , or
, or  to perform the corresponding action.
Notifications
Refer to Surveillance Station Help for more information about notification settings.
Receive notifications
Tap  from the left panel or go to Notifications >
  > Settings and enable Push Service.
Temporarily mute notifications
Tap  from the left panel or go to Notifications >
  > Settings > Mute for and select a duration, or tap Do not disturb > Enable and set a specific time.
Configure notifications for specific events, functions, and services
Go to Notifications >  > Settings > Notification Items. Tap on System, Camera, or More and to enable or disable specific notifications for cameras and other system functions.
Home Mode
The Auto Switch function allows you to switch to Home Mode automatically when your mobile device enters the Home location or connects to the Home Wi-Fi.
Home Mode and Auto Switch can only be enabled and modified with sufficient Surveillance Station privileges. Refer to Surveillance Station Help for more information about Home Mode settings.
Set up Auto Switch for Home Mode
- Go to the Home Mode page, and enable Auto Switch.
To use the location of your mobile device to decide if you are at home or away, tap Use device location and go to your device's system settings to allow DS cam to always use your location. (For iOS 14, precise location must be enabled.) - Under Device Location Settings, tap Home location. You can drag the location pin to adjust the location or enter an address or a name in the search bar.
- To use the connected Wi-Fi of your mobile device to decide if your are at home or away, tap Use connected Wi-Fi.
- Tap Home Wi-Fi, and add the currently connected Wi-Fi as Home Wi-Fi by tapping
 . Only Wi-Fi that is currently connected can be added as Home Wi-Fi, but multiple Wi-Fi networks can be added.
Manage devices that are affecting the Home Mode status:
Go to Home Mode > Device Status.
Enhance the accuracy of Auto Switch
Configure these options at the Home Mode page.
- Go to Set Home location > Radius and define the detection area according to your actual environment.
- Enable GPS assistance to help DS cam detect your location more precisely.
- Enable both Use device location and Use connected Wi-Fi. Home Mode will be activated when the location of your mobile device is in the Home Location, or your mobile device connects to one of the Home Wi-Fi networks.
Note:
- Enabling GPS assistance may increase power consumption.
- When there are multiple devices, Home Mode will be activated by the first device that enters the Home Location or connects to one of the Home Wi-Fi networks and deactivated by the last device that leaves or disconnects.
- When you enable Use device location for Auto Switch, DS cam will continue to detect the location even when it is running in the background.
License
Access licenses
Go to the License page to access licenses installed on your Synology server.
Note:
- If Centralized Management System (CMS) is set up on your Surveillance Station, you can manage all licenses installed in the central management system on the CMS host.
Add licenses
Go to the License page and tap  . Follow the on-screen wizard to add licenses.
-
- To remove the entered license, swipe left on the license field and tap Delete to remove the license field.
- To add multiple licenses, tap
 to turn on the QR code scanner.
Delete licenses
Go to the License page, swipe left on a license, and tap Delete to delete the license.
Add/delete surveillance device licenses offline
On the login page, tap  on the bottom left and go to Offline License Validation> Manage License > Add/Delete License. Follow the on-screen wizard to manage your licenses.
Sign in to your Synology server on DS cam. The licenses will be automatically imported or deleted.